How to make a file upload form for Dropbox
If you need a simple way for people to upload files directly to your Dropbox, you've probably run into some friction. Dropbox's built-in File Request feature doesn't let you collect information alongside uploads. Sharing a folder link means uploaders need a Dropbox account and can see each other's files. And emailing files back and forth creates a mess of attachments, version confusion, and storage limits.
What you actually need is a file upload form for Dropbox: a branded page where anyone can submit files and fill out form fields, with everything delivered straight to your Dropbox folder, organized automatically. No login required for the person uploading. No app downloads. No folder permission headaches.
This guide walks through how to build one using EZ File Drop, a tool designed specifically for collecting files from other people. We'll cover connecting Dropbox, building your form, branding it, setting up automatic file organization, and sharing the finished form.
Why Dropbox Alone Isn't Enough for File Collection
Dropbox is a great place to store and share files. But collecting files from other people is a different workflow, and Dropbox's native tools have real limitations.
Dropbox File Request lets you create a link where people can upload files to a specific folder. But that's all it does. You can't add form fields to collect the uploader's name, email, project details, or any other context. There's no branding customization. Notifications only go to the Dropbox account owner. And you can't embed a File Request on your website.
Sharing a Dropbox folder is even more limited. The uploader typically needs a Dropbox account, they can see other people's files in the folder, and there's no way to collect structured data or organize incoming files automatically.
These gaps are exactly what EZ File Drop fills. It connects to your existing Dropbox account and adds a file intake layer with custom form fields, branding, dynamic file organization, and a frictionless experience for uploaders. For a more detailed comparison, see how EZ File Drop is different from using Dropbox alone.
What You'll Need Before You Start
Setting up a file upload form for Dropbox takes about five minutes. You'll need a Dropbox account (personal or business) and an EZ File Drop account. You can start a free trial with no credit card required. The trial gives you 7 days on the Business plan with 1 GB of upload bandwidth, which is plenty to build and test your form.
That's it. No coding, no plugins, no server setup.
Step 1: Create Your EZ File Drop Account
Head to ezfiledrop.com/join and sign up. Every new account starts on a Business plan trial, so you'll have access to all the features covered in this guide. You can evaluate everything before committing to a paid plan.
Step 2: Connect Dropbox
Once you're logged in, connect your Dropbox account. EZ File Drop uses OAuth2 authentication, meaning you authorize access through Dropbox's own login screen. EZ File Drop never sees your Dropbox password, and you can revoke access at any time.
Each upload form can have its own destination folder in Dropbox, so you can route files from different forms to different locations.
For a detailed walkthrough, see the Dropbox connection tutorial.

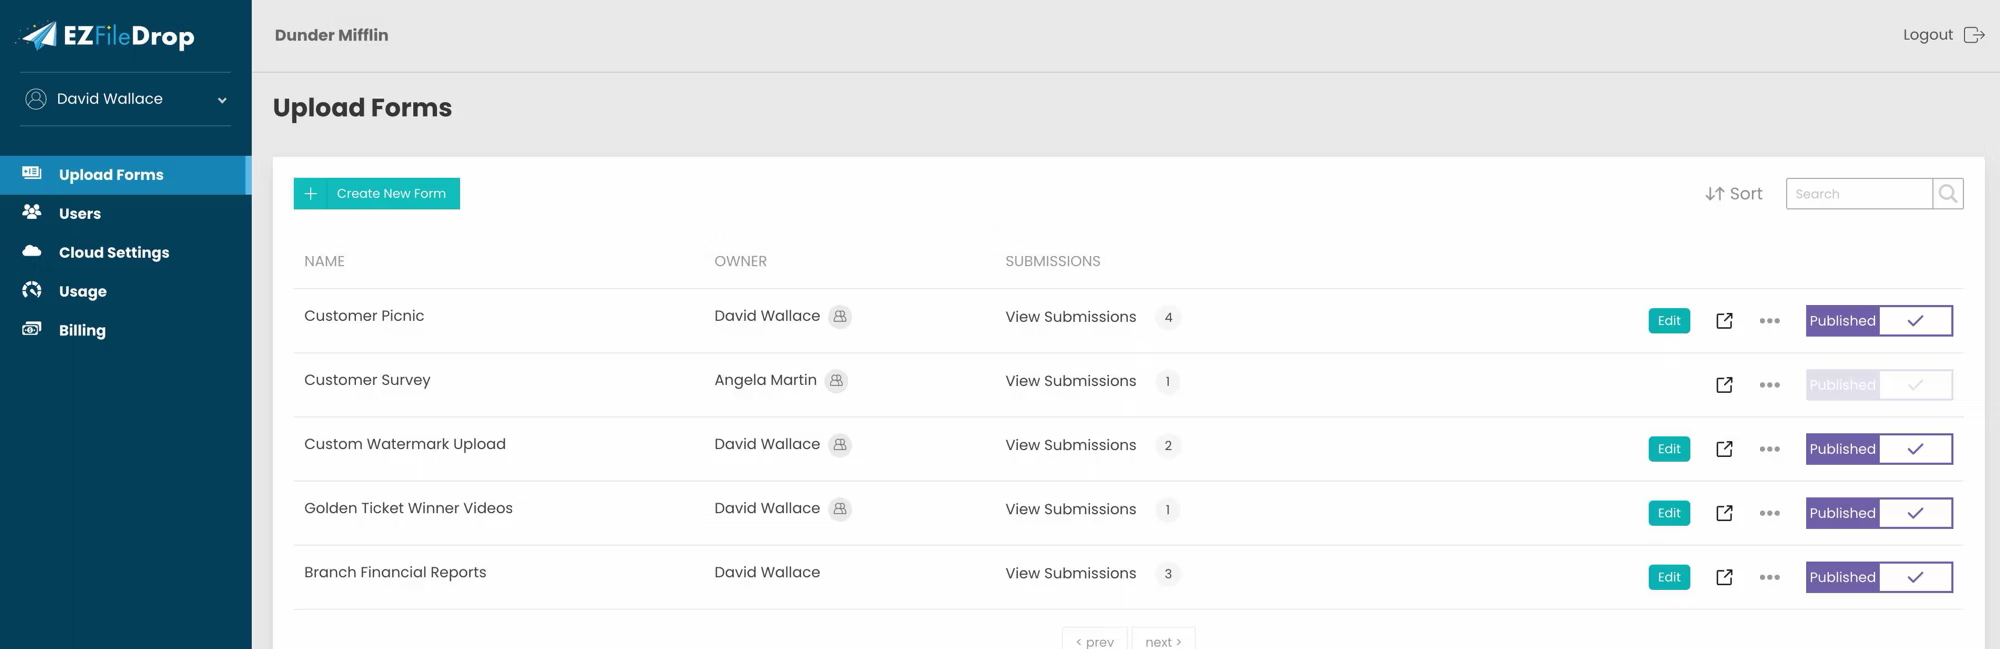
Step 3: Build Your Upload Form
Click "Upload Forms" in the main menu, then "Create New Form." The Upload Form editor opens, and this is where you'll configure everything.
Name and URL
Give your form a name. This is an internal label that helps you identify the form in your dashboard. The name auto-populates the Page URL, which you can customize. For example, if you name the form "Client Assets," the URL might become ezfiledrop.com/your-team/client-assets.
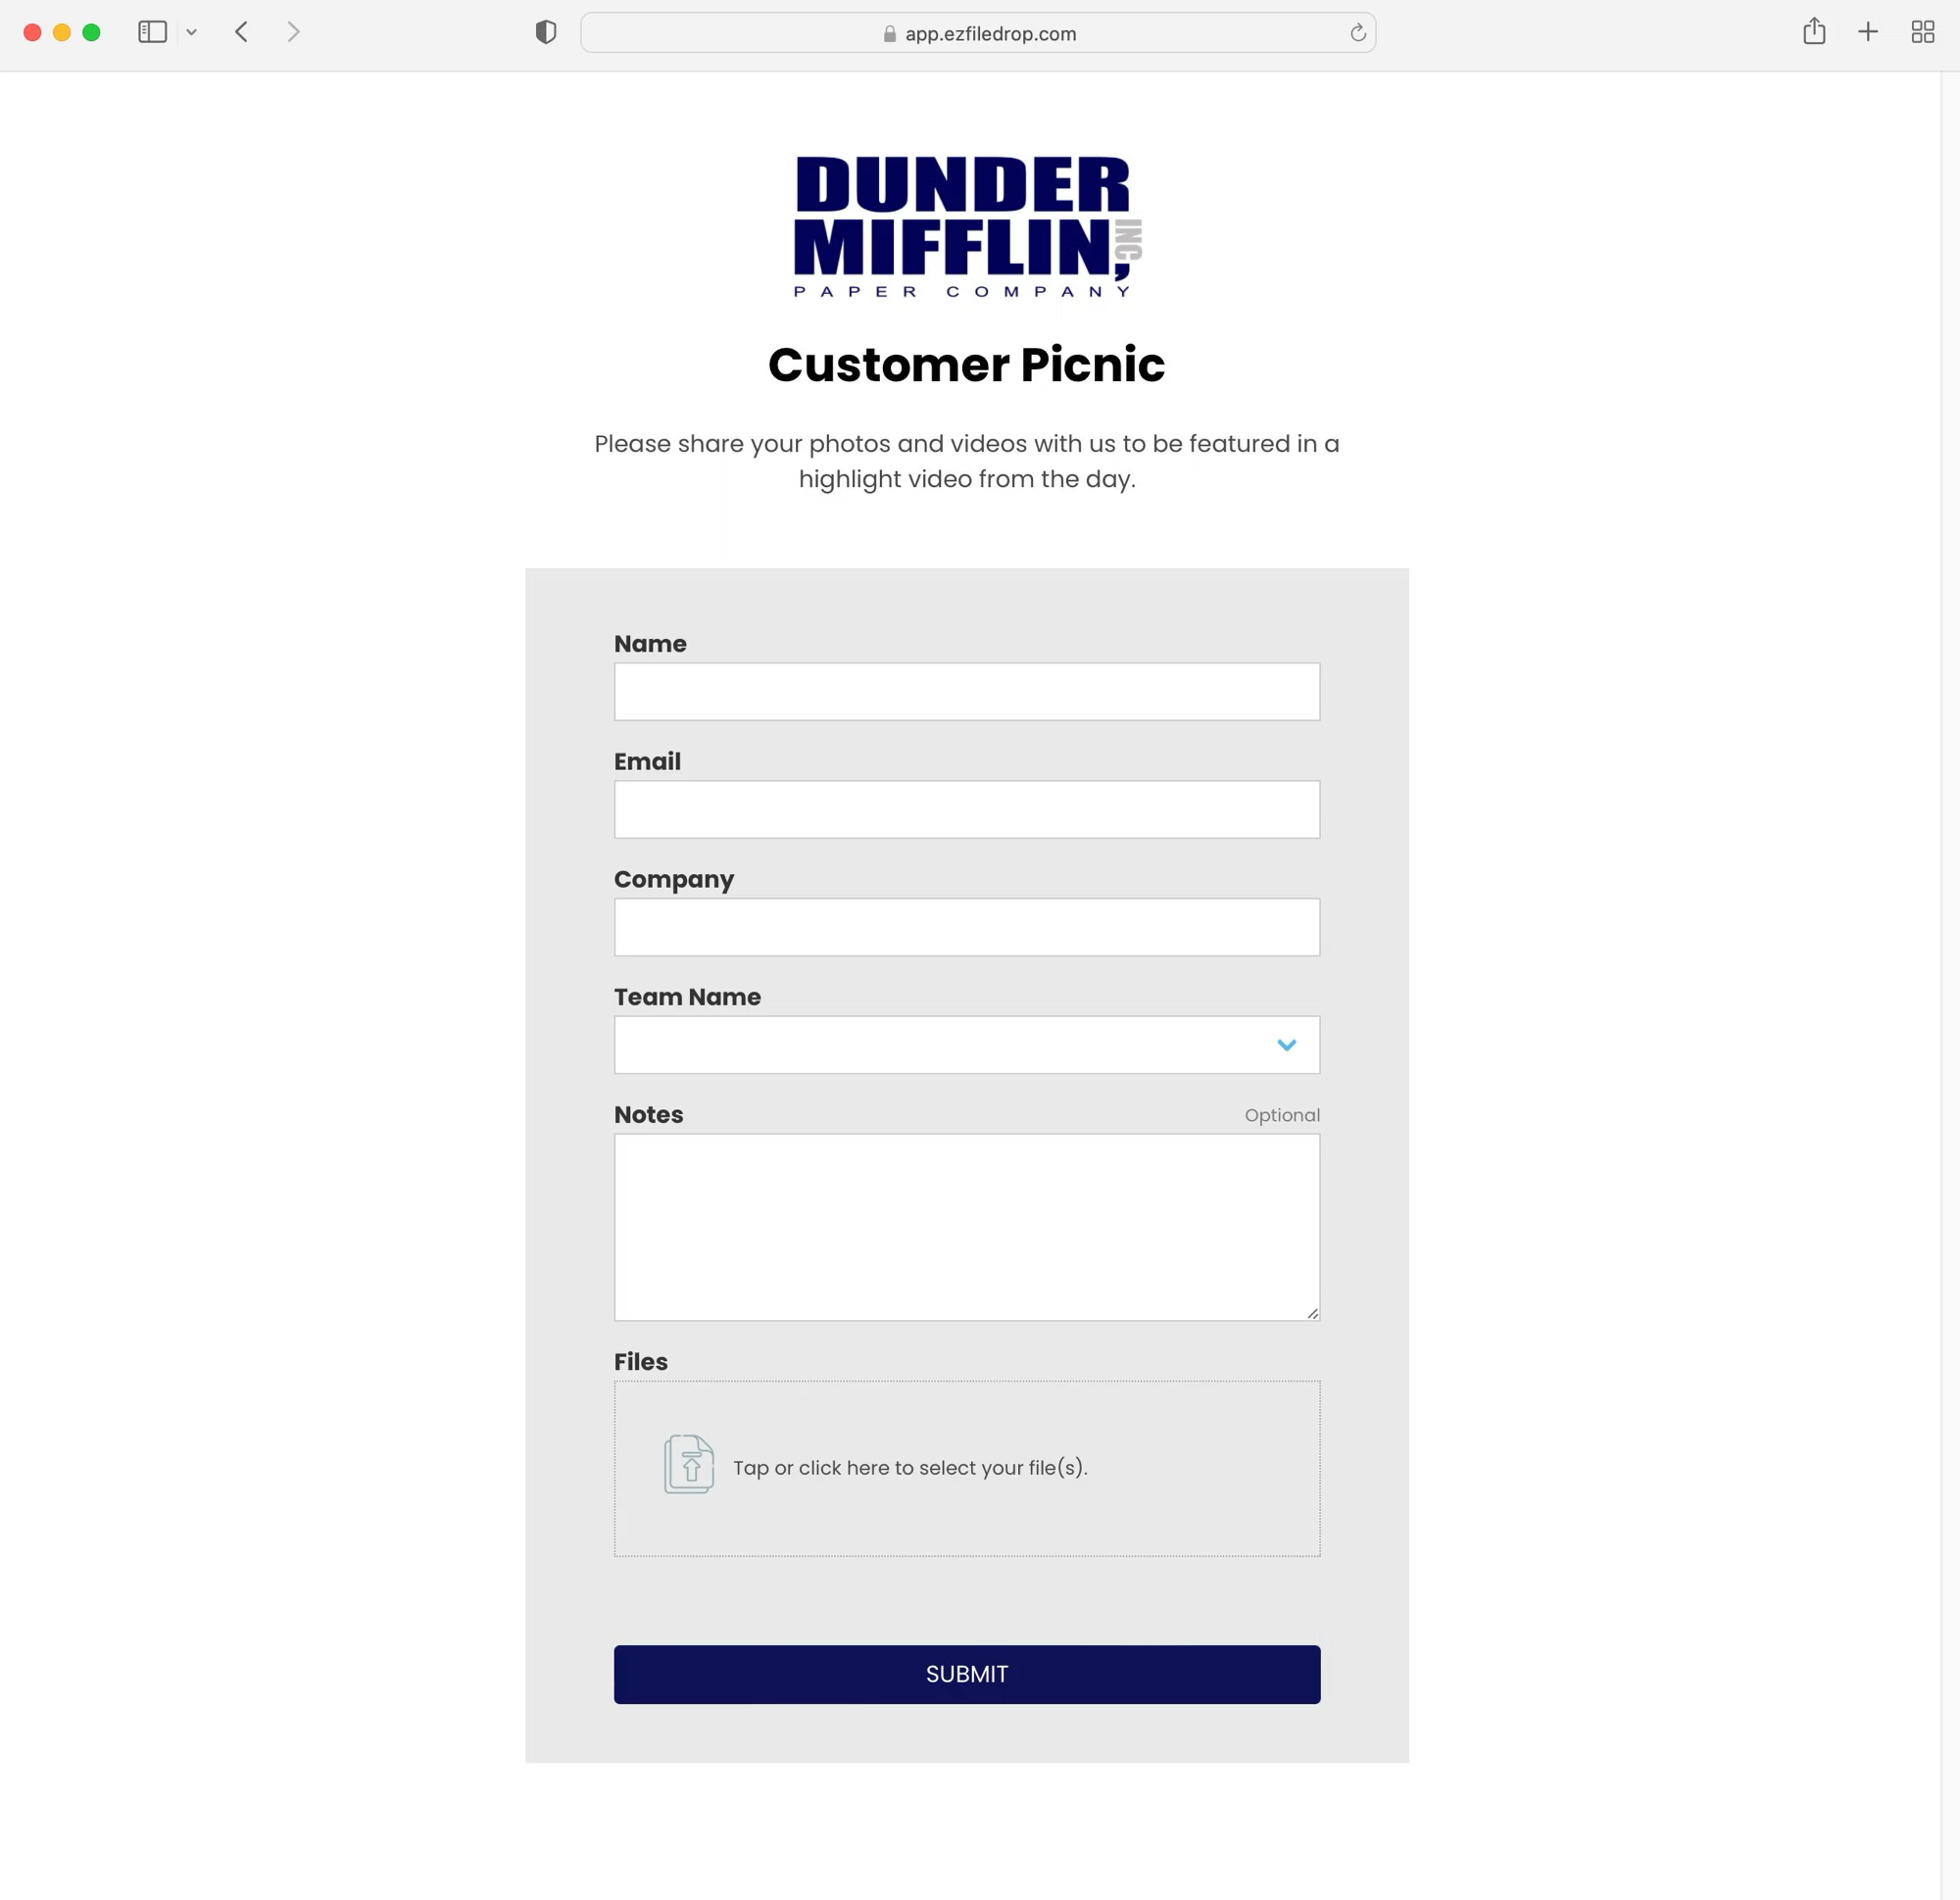
Page Header and Welcome Message
Add a logo, a custom page header, and a welcome message. Even if you plan to embed the form on your website later, upload a logo here. It appears in the email notifications that EZ File Drop sends after each upload.

Custom Form Fields
This is the biggest advantage over Dropbox File Request. You can collect structured information alongside the uploaded files.
EZ File Drop supports text fields, email fields, phone number fields, comment boxes, dropdown menus, radio buttons, and checkboxes. Set each field as required or optional.
Common examples include the uploader's name and email, a project name or reference number, a dropdown for file category or department, and a checkbox for agreeing to terms. These fields serve double duty: they collect useful data and they can be used to automatically organize files in Dropbox (more on that in Step 4).

File Drop Zones
The file drop zone is where uploaders drag and drop files or click to browse. On Business and Premium plans, you can add multiple file drop zones per form. This is useful when you need different types of files collected separately (e.g., "Upload your logo files" and "Upload your brand guidelines").
You can also restrict allowed file types (only PDFs, only images, etc.) and set a maximum file size per form.

Step 4: Set Up Dynamic File Organization
This feature makes EZ File Drop especially powerful as a Dropbox file upload form. Instead of every file landing in one folder, you can use form field data to automatically create subfolders and rename files as they arrive.
For example, if your form collects the uploader's name, you can configure EZ File Drop to create a subfolder in Dropbox using that name. Files from "Sarah Johnson" land in a "Sarah Johnson" folder. Files from "Mike Chen" land in a "Mike Chen" folder. You can even nest subfolders using multiple fields, like organizing by client name and then by project ID.
You can also prepend form field data to file names. If Sarah uploads "contract.pdf," it arrives in your Dropbox as "Sarah Johnson - contract.pdf."
For a deeper dive, check out the Dynamic File Organization tutorial.

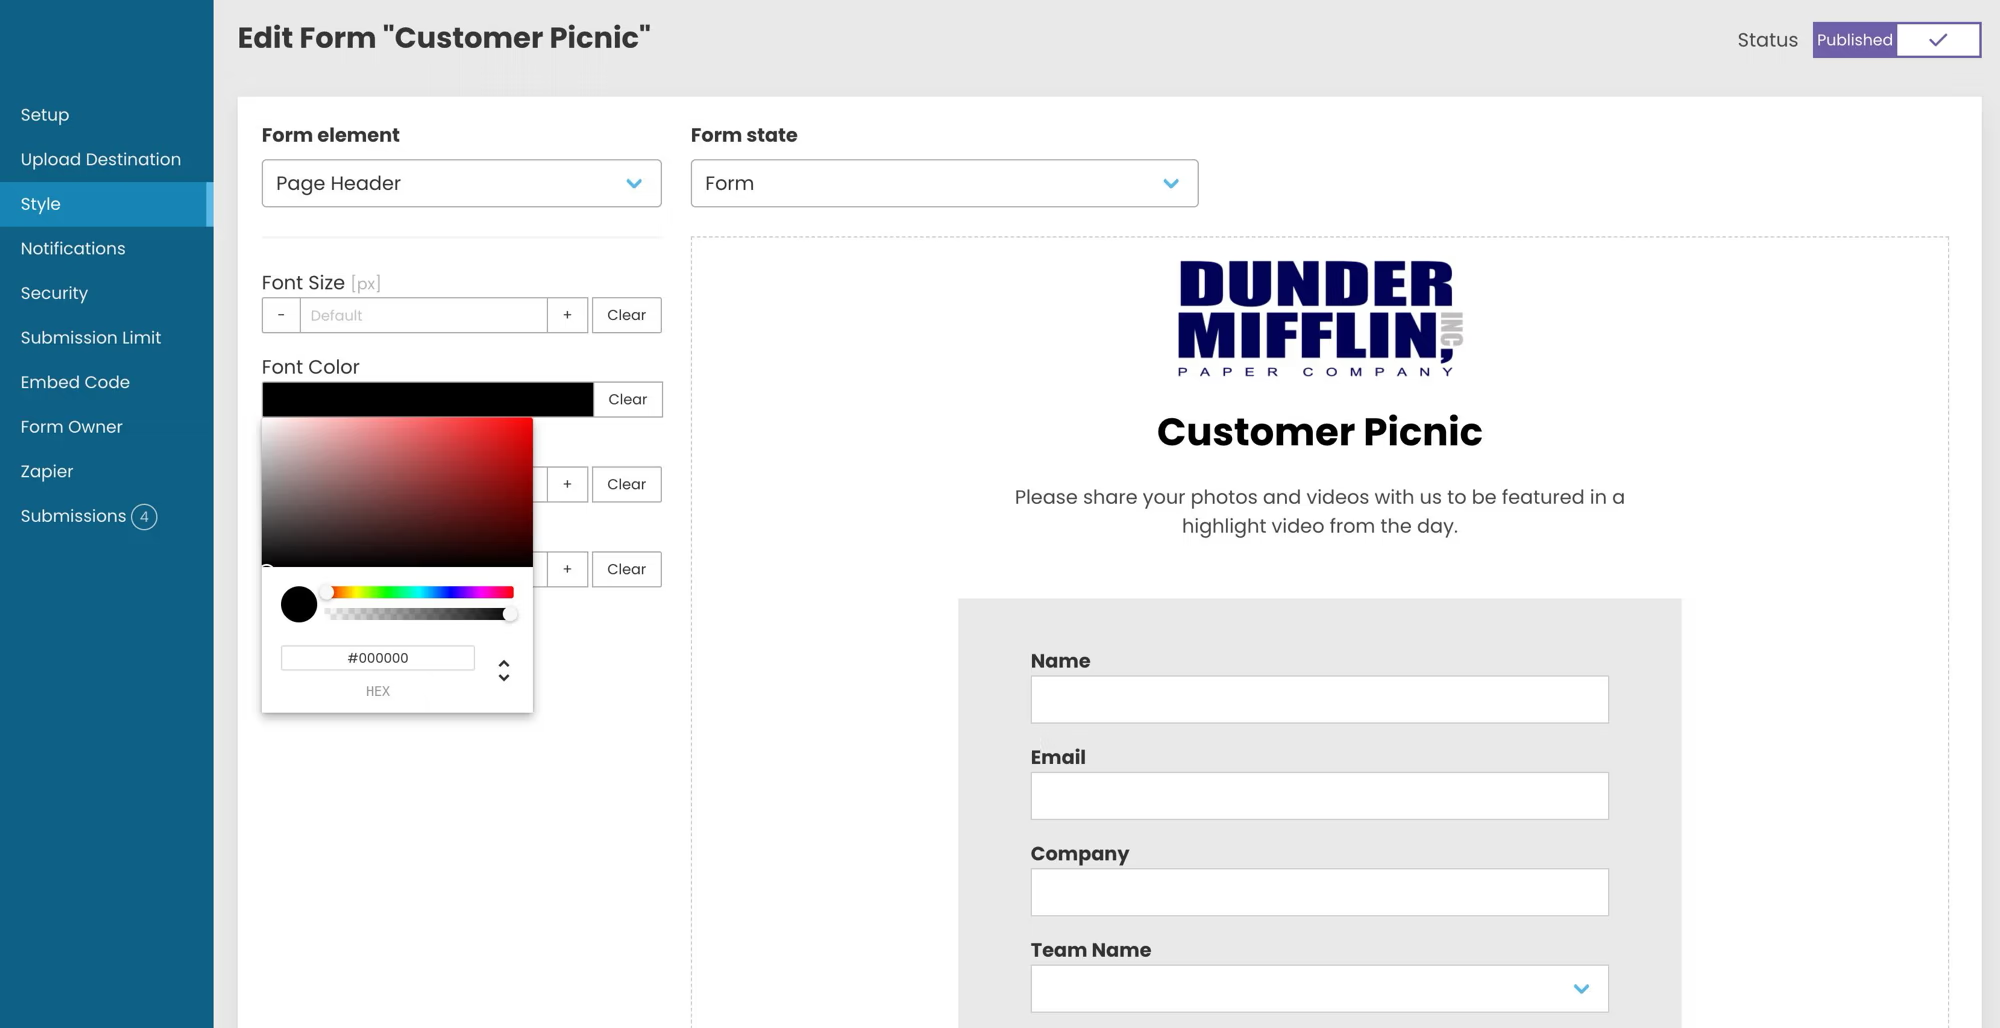
Step 5: Customize the Branding and Style
EZ File Drop gives you full control over how your upload form looks. On the Business and Premium plans, forms are white-labeled, so no EZ File Drop branding appears.
The Style editor lets you customize colors, fonts, button styles, backgrounds, and more for every element of the form. Match it to your company's brand guidelines so the form feels like a native part of your workflow or website.
For a full walkthrough, see the customization and styling tutorial.
Step 6: Configure Notifications
EZ File Drop sends email notifications to three separate groups: the uploader (confirming their submission), your team (alerting you that files have arrived), and any third-party recipients you specify.
This is another area where EZ File Drop improves on Dropbox's native tools. Dropbox File Request only notifies the account owner. EZ File Drop lets you customize who gets notified and what the notification says, including using your own branding and custom HTML templates.
For setup details, see the Email Notifications tutorial.
Step 7: Publish and Share Your Form
Click "Save and Publish," and your file upload form for Dropbox is live. You have two ways to share it.
Standalone Web Page
Every Upload Form gets a custom URL that works as a standalone page. No hosting or configuration needed. Share the link via email, text, or messaging, and anyone can start uploading files to your Dropbox immediately.
Embed on Your Website
You can also embed the form directly on your website. EZ File Drop generates an embed code you copy and paste into any website platform: WordPress, Webflow, Wix, Squarespace, or any site that supports HTML embeds. No coding or plugin required. The embed code includes toggles to show or hide the logo, header, and page text.
For step-by-step instructions, see the embedding tutorial.

EZ File Drop vs. Dropbox File Request
If you're weighing EZ File Drop against Dropbox's built-in File Request, here's how they compare on the features that matter most for file collection.
EZ File Drop lets you add custom form fields to collect information alongside uploads. Dropbox File Request does not. EZ File Drop offers full branding and white-labeling. Dropbox File Request always shows Dropbox branding. EZ File Drop can be embedded on any website. Dropbox File Request cannot. EZ File Drop sends notifications to uploaders, your team, and third parties. Dropbox File Request only notifies the account owner. EZ File Drop automatically organizes files into subfolders using form field data. Dropbox File Request puts all files in a single folder. Both tools allow uploaders to submit files without creating an account.
Dropbox File Request is fine for quick, one-off requests where you just need files in a folder. EZ File Drop is the better choice when you need to collect information alongside files, keep things organized, or present a branded experience.
Tips for Getting the Most Out of Your Dropbox Upload Form
Use URL Query Parameters for Pre-Filled Forms
If you already know the uploader's name or project, you can pre-fill form fields using URL query parameters. This saves the uploader time and keeps data consistent.
Set Up Submission Limits or Expiration Dates
For event-specific or project-based forms, set a submission limit or an expiration date. A custom message displays to anyone who tries to upload after the deadline.
Frequently Asked Questions
Do uploaders need a Dropbox account?
No. Anyone can upload files through your form without logging in, creating an account, or downloading an app. Files go straight to your Dropbox.
Can uploaders submit files from a phone?
Yes. The form is fully mobile-friendly. Uploaders can submit files from any iOS or Android device at full resolution with no compression.
Is there a file size limit?
The platform maximum is 150 GB per file. You can set a lower limit per form if needed. Monthly upload bandwidth depends on your plan: 5 GB on Starter, 100 GB on Business, and 1 TB on Premium.
Can I restrict which file types are accepted?
Yes. You can restrict uploads to specific file extensions on a per-form basis.
What happens to files after upload?
Files are temporarily staged on encrypted Amazon S3 servers, then transferred to your Dropbox. Once the transfer completes, the temporary copy is deleted. EZ File Drop does not store your files long-term.
Can uploaders see other people's files?
No. Each submission is completely private. Uploaders never have access to your Dropbox or to files submitted by anyone else.
Start Collecting Files in Dropbox Today
Building a file upload form for Dropbox doesn't need to be complicated. With EZ File Drop, you can have a branded, organized file collection system connected to your Dropbox in under five minutes.
→ See how EZ File Drop works with Dropbox
Written by Matt Townley
Try EZ File Drop Today!
Start Free TrialIntegrations
EZ File Drop + Google DriveEZ File Drop + DropboxEZ File Drop + OneDriveEZ File Drop + BoxStay in Touch


