How to make a file upload form for Box
If you need people to upload files directly to your Box account, you've probably discovered Box doesn't make this easy for everyone. Shared folders require uploaders to have Box accounts. Box File Request is powerful, but it requires a Box Business plan or higher, strips your branding, and can't be embedded on your website. Emailing files back and forth leads to inbox clutter, size limits, and zero organization.
What you actually need is a file upload form for Box: a simple, branded page where anyone can submit files that land directly in your Box folder, organized exactly how you want them. No login required on their end. No Box plan upgrade required on yours. No permission headaches.
This guide walks through how to build one using EZ File Drop, a tool purpose-built for exactly this. We'll cover the full setup: connecting Box, building your form, customizing the branding, organizing incoming files automatically, and sharing the form with uploaders.
Why Box Alone Falls Short for File Collection
Box is excellent for storing and collaborating on files, and Box File Request is a genuinely capable native option. But there are specific gaps that EZ File Drop closes.
Sharing a Box folder means the uploader needs a Box account and must navigate your folder structure. They can also see other files in the folder, which may be a privacy issue. For a deeper comparison of the native options, see How Is EZ File Drop Different from Box File Requests?.
Box File Request has real strengths (custom form fields, large file support on Enterprise plans) but also specific limits: it's gated to Box Business plans and above, upload pages are Box-branded with no way to add your logo or colors, there's no embed code for your website, and notifications only go to the Box account owner.
EZ File Drop sits on top of Box and adds a file intake layer with branded upload pages, form fields, dynamic file organization, multi-recipient notifications, and zero friction for the person uploading. It works with any Box plan, including Starter.
What You'll Need Before You Start
Setting up a file upload form for Box takes about five minutes. Here's what you need:
A Box account with access to the folder where you want files to land. Any Box plan works, including Starter and personal tiers. You'll also need an EZ File Drop account. You can start a free trial with no credit card required. The trial gives you 7 days on the Business plan with 1 GB of upload bandwidth, which is enough to build and test your form.
That's it. No coding, no plugins, no server configuration.
Step 1: Create Your EZ File Drop Account
Head to ezfiledrop.com/join and sign up. Every new account starts on a Business plan trial, so you'll have access to all the features covered in this guide. You can evaluate everything before deciding on a paid plan.
Step 2: Connect Box
From the main EZ File Drop dashboard, open Cloud Settings and click Connect to Box. EZ File Drop uses OAuth2 to link to your Box account, so your Box password never leaves Box. You'll approve the connection in a standard Box authorization window and be returned to EZ File Drop with Box connected.
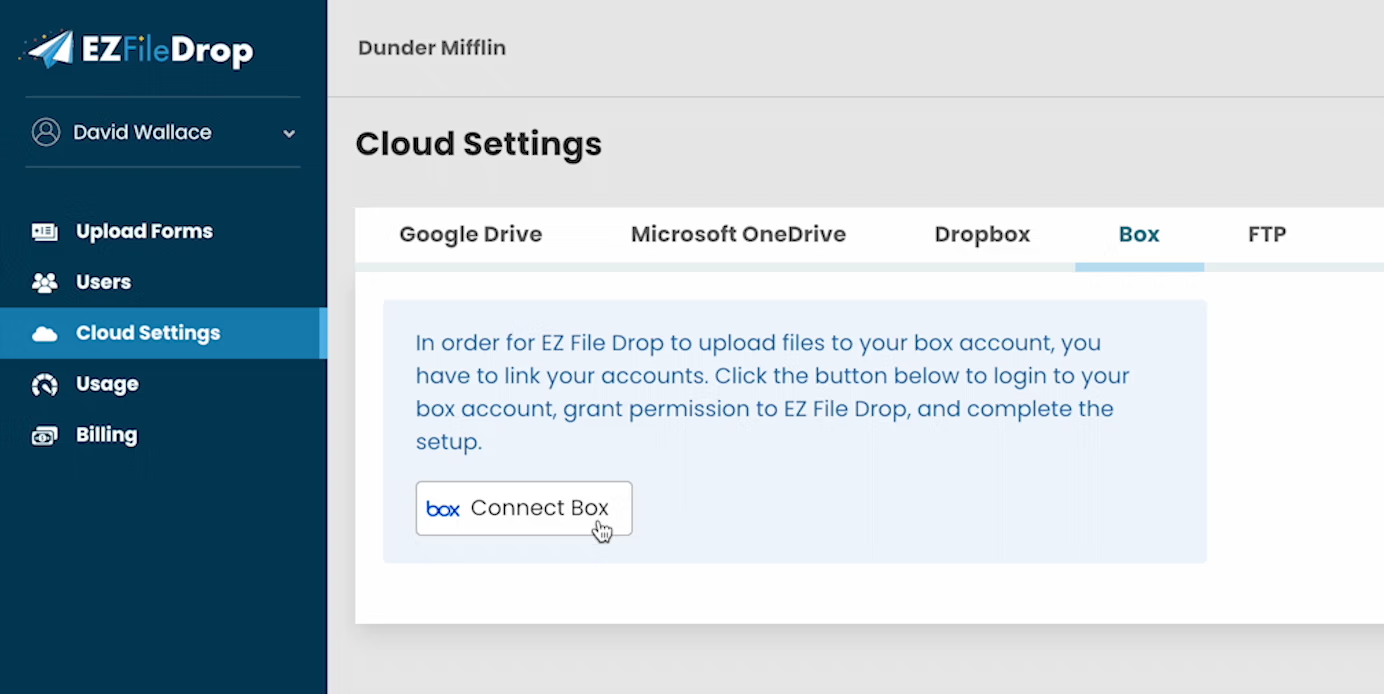
For a detailed walkthrough of the connection step, see the Box connection tutorial.
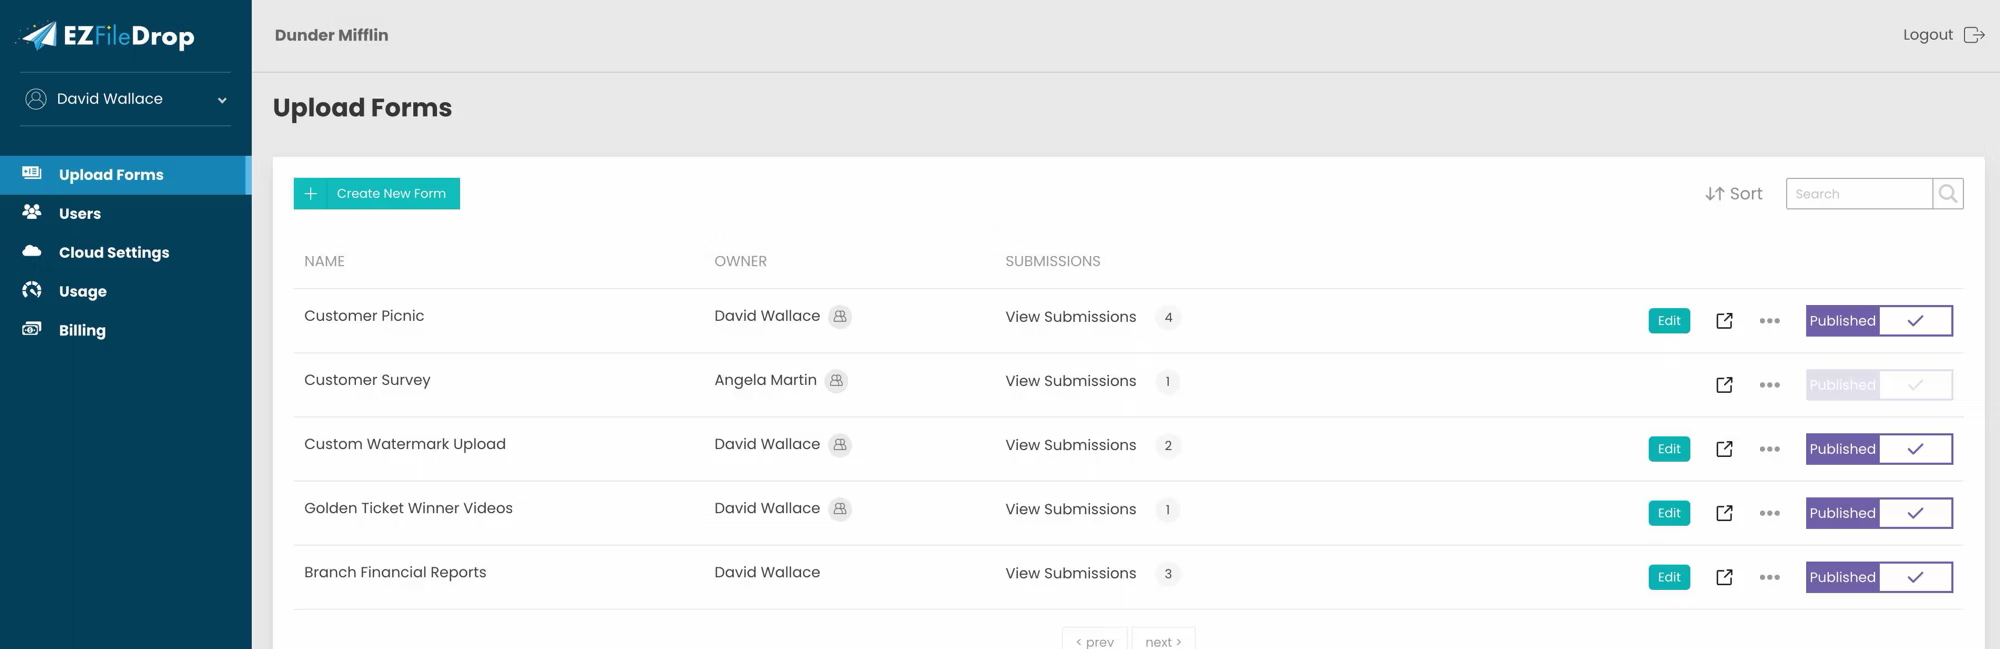
Step 3: Build Your Upload Form
From the main menu, click Upload Forms, then Create New Form. This opens the Upload Form editor.
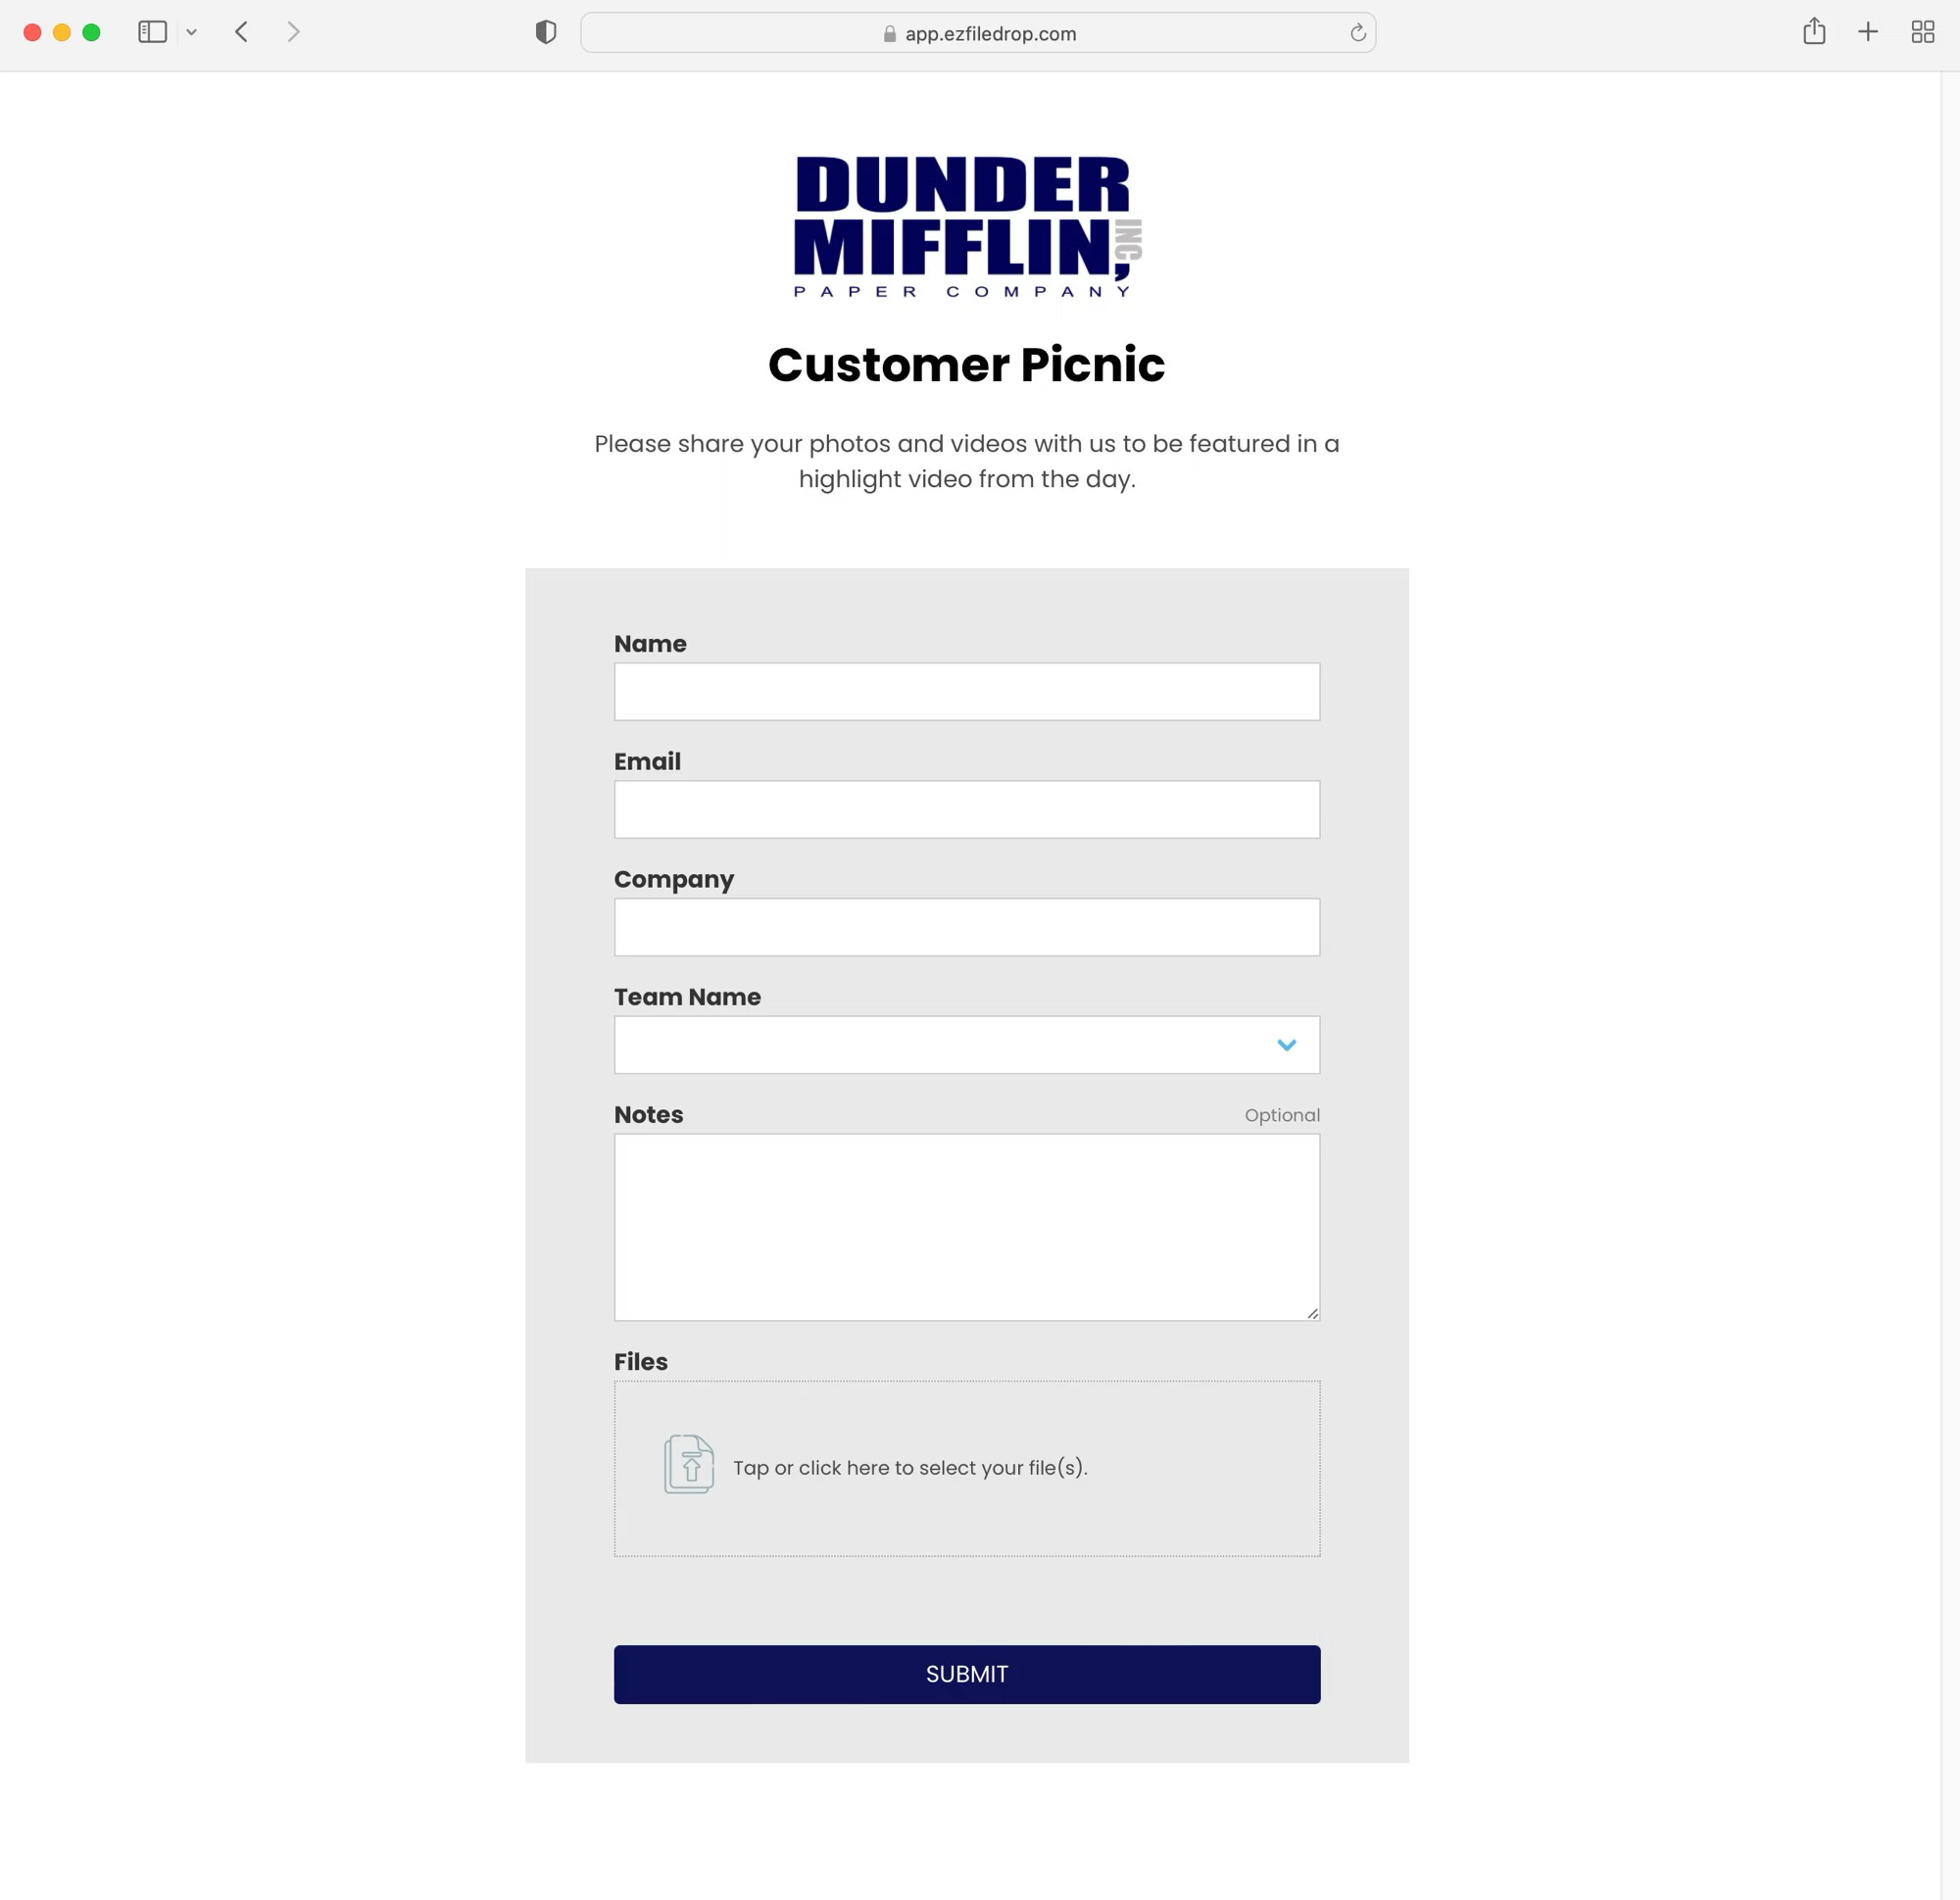
Name and URL
Give your form a name. By default, the name auto-populates the form's URL slug, which becomes the shareable URL at ezfiledrop.com/yourteam/form-name. You can edit the URL slug to match your preference.
Page Header and Welcome Message
Upload your logo, write a page header, and add a welcome message. This content appears on the standalone upload page and in the default email notifications sent to the uploader, form owner, and anyone else you set up to receive upload alerts.
Even if you plan to embed the form on your own website and hide the logo there, still upload one here. It will be used in the email notifications that get sent with every submission.

Custom Form Fields
Scroll down to the Form Fields section. EZ File Drop supports text fields, dropdown menus, checkboxes, and radio buttons. Use these to collect context alongside the files: name, email, project ID, category, agreement to terms, or anything else you want to capture with each submission.
Any field can be marked required or optional. Field values can also be used to automatically organize incoming files in Box (covered in Step 4).

File Drop Zones
Set allowed file types, a maximum file size per upload (up to 150 GB per file on Business and Premium plans), and whether uploaders can submit multiple files at once. The drop zone text is customizable. The default is fine, but you can tailor it to specific use cases ("Upload your signed contract here," "Drop project photos here," etc.).

Step 4: Set Up Dynamic File Organization
This is where EZ File Drop goes beyond what's possible natively. In the Cloud Destination section, select the Box folder where files should land.
Then use the dynamic file organization settings to automatically create subfolders and prepend file names based on form field data. A form that collects a project name and an uploader name could route each file into a subfolder named after the project, with filenames prepended by the uploader. So a photo from Sarah Johnson for the Website Redesign project arrives in your Box as "Sarah Johnson - headshot.jpg" inside a "Website Redesign" folder. You never have to rename files or move them.

For the full walkthrough, see the Dynamic File Organization tutorial.
Step 5: Customize the Branding and Style
Open the Style editor to customize the look and feel of your upload form. The Form Element dropdown lets you toggle between every part of the form (logo area, headline, body text, form fields, drop zone, success message, buttons) and edit colors, fonts, spacing, and copy.
On Business and Premium plans, the form is fully white-labeled with no EZ File Drop branding.
Step 6: Configure Notifications
EZ File Drop has three notification recipient groups: the Uploader, your Team, and a Third Party. You can send customized HTML emails to each group with variables like file URLs, file counts, and any form field data. The uploader gets a branded confirmation, your team gets an alert, and any third party you want looped in (a client, a project manager, an external reviewer) gets their own message.
Default HTML templates are included. If you want to write your own, EZ File Drop makes it easy to integrate dynamic variables for file names, file URLs, form field values, upload count, and timestamps.
Step 7: Publish and Share Your Form
Click Save and Publish. Your form is live immediately. There are two ways to share it.
Standalone Web Page
Every form has a custom URL at ezfiledrop.com/yourteam/form-name. Copy and share it, no hosting or setup required.
Embed on Your Website
Copy the embed code and paste it into your site. Works with WordPress, Webflow, Squarespace, Wix, or any page that supports HTML embeds. No plugins, no coding. Toggles let you show or hide the logo, header, and page text so the embedded form matches the surrounding page design.

See the embedding tutorial for step-by-step setup on each platform.
Tips for Getting the Most Out of Your Box Upload Form
Use URL Query Parameters for Pre-Filled Forms
If you're sending the upload link to a specific person, you can pre-fill form fields via URL query parameters. For example, appending ?name=Sarah+Johnson&project=Website+Redesign to the URL pre-fills those fields. The uploader still reviews, but saves typing.
Set Up Multiple Forms for Different Workflows
Each EZ File Drop form has its own destination folder, branding, form fields, and notification rules. For client work, create one form per client. For events, create one per event. You can spin up as many forms as you need under one EZ File Drop account.
Frequently Asked Questions
Do uploaders need a Box account to use the form?
No. Anyone with the link or the embedded form can upload files without a Box account. That's the core benefit — the files still land in your Box, but the uploader never has to sign in or create an account.
What Box plan do I need?
Any Box plan works, including Starter and personal tiers. This is a key difference from Box File Request, which requires Box Business or higher.
Is there a file size limit?
EZ File Drop lets you accept files up to 150 GB per file on any plan. You can also set a lower per-form limit if you want to cap submission sizes. Keep in mind that each plan has a monthly upload bandwidth cap (5 GB on Starter, 100 GB on Business, 1 TB on Premium), and uploads beyond that cap incur overage billing.
Can I restrict which file types are accepted?
Yes. Each form has file type controls, so you can restrict uploads to specific types (PDFs only, images only, etc.) or allow all file types.
What happens to the files after they're uploaded?
Files go directly into the Box folder you selected when you set up the form. They're stored in your Box account, using your existing Box storage, and organized by the dynamic file organization rules you configured. EZ File Drop doesn't keep a copy after the upload completes.
Can I embed the form on any website?
Yes. EZ File Drop provides an embed code that works on WordPress, Webflow, Squarespace, Wix, or any website that supports HTML embeds. No plugins or coding required.
Start Collecting Files in Box Today
Setting up a file upload form for Box takes five minutes, and EZ File Drop adds the branding, form fields, dynamic file organization, and multi-recipient notifications that native Box tools don't provide — while keeping files exactly where they belong: in your Box account.
Start a free trial with no credit card required. For more detail on how the Box integration works, see the Box integration page.
Written by Eric Stracke
Try EZ File Drop Today!
Start Free TrialIntegrations
EZ File Drop + Google DriveEZ File Drop + DropboxEZ File Drop + OneDriveEZ File Drop + BoxStay in Touch


