
Bookkeeping Client Onboarding Checklist: 12 Steps
Onboarding a new bookkeeping client should take a couple of weeks. It often stretches past a month, and the reason is usually the same: the documents you need are scattered across the client's inbox, their previous accountant's systems, and cloud accounts they can't quite remember the passwords to.
If you've run a practice for a while, you already know which clients are slow and which documents always go missing. This bookkeeping client onboarding checklist isn't here to teach you the work. It's a benchmark to compare your process against, with a close look at the step where most of the time goes: collecting documents. If you're newer to running a practice, it works as a first-time blueprint. For the document step, we'll also show how to collect every onboarding document with one link using EZ File Drop.
The checklist at a glance
Copy this into your own onboarding doc or practice management tool. Each step is covered in detail below.
- Discovery call: scope confirmed
- Engagement letter: signed, with scope and fees
- Intake form: entity, EIN, software, and prior accountant captured
- Document request: sent, grouped by category
- Software access: accountant or admin access granted
- Historical catch-up: cutoff set and books brought current
- Reconciliation: every bank and credit card account reconciled
- Chart of accounts: reviewed and adjusted
- Recurring transactions: rules and recurring entries set up
- Reporting cadence: reports, dates, and format agreed
- Communication norms: one standard way to send documents
- 30-day check-in: first clean monthly close done
What is bookkeeping client onboarding?
Bookkeeping client onboarding is the structured process of bringing a new client into your practice. It covers the engagement letter, discovery and setup work, historical document collection, and the first month of live bookkeeping under your management. Done well, it ends with prior periods caught up, accounts reconciled, and your software set up so monthly bookkeeping runs cleanly from then on.
It isn't the same as a client intake form. The intake form captures basic information at the start. Onboarding is the whole workflow that follows.
The 12-step bookkeeping client onboarding checklist
Work through it in order. Each step has a clear deliverable, and each one feeds the next.
Step 1: Discovery call
Before any paperwork, hold a 30 to 45 minute discovery call. Confirm the client's entity type, fiscal year, current bookkeeping software, payroll setup, sales tax obligations, and any open issues with the IRS or state tax agencies. The goal is to scope the work accurately so the engagement letter reflects reality.
Step 2: Engagement letter
Send the engagement letter within a day or two of the call. Spell out the scope of work, fees, payment terms, and the documents you'll need from the client. A clear scope here prevents disputes later, especially over catch-up work, which is easier to price as its own project than to fold into the monthly fee.
Step 3: New client intake form
Send one intake form that captures everything you need to set up the engagement: legal entity name, EIN, business address, primary contact, fiscal year end, current accounting software, the prior accountant's contact information, and any IRS notices or audit history.
Step 4: Document collection request
Once the intake form is back, send the document request. This is where most onboarding time goes, so the next two sections cover the full document list and how to collect it cleanly.
Step 5: Software access and permissions
Get accountant or admin access to the client's accounting software, whether that's QuickBooks Online, Xero, Wave, or something else. If they're moving platforms, this is also when you set up the new file and confirm the chart of accounts.
Step 6: Historical catch-up
Most new clients are behind. Catch-up covers the period from their last clean books to today. Set a clear cutoff, usually the start of the current fiscal year or the last reconciled month, and work forward from there.
Step 7: Bank and credit card reconciliation
Reconcile every bank account and credit card from the cutoff forward. Discrepancies surface here, and they get harder to resolve the longer they wait.
Step 8: Chart of accounts review
Walk through the chart of accounts. Small businesses tend to have either too many accounts (a line for every vendor) or too few (everything in "Office Expenses"). Adjust the structure to match what the business actually needs to report.
Step 9: Recurring transactions and rules
Set up bank rules and recurring transactions for predictable items: rent, software subscriptions, payroll, and regular vendors. This is what makes monthly bookkeeping fast from here on.
Step 10: Reporting cadence
Agree on a monthly reporting schedule. Confirm which reports the client wants (P&L, balance sheet, cash flow, AR and AP aging), the date they'll get them each month, and the format.
Step 11: Communication norms
Decide how the client will send you documents going forward. If you never set a standard, every client picks their own method, and you end up supporting five ways of receiving files at once. If your current standard is "email me whatever," this is the moment to change it. The setup section below shows one way to do it.
Step 12: 30-day check-in
Schedule a check-in for 30 days out. Confirm the catch-up is finished, the first clean monthly close has happened, and reports are going out on schedule. Onboarding is done when this check-in is.
Documents to collect from a new bookkeeping client
Send this list at step 4, grouped by category, and adapt it to the client's situation.
The list is long because it has to be. Grouping it by category lets the client work through one batch at a time instead of facing a 25-item email.
Why document collection stalls onboarding
You send the list. The client replies with a few attachments and "I'll send the rest soon." Two weeks later you're chasing the missing items, they're forwarding old emails with files named Scan_039.pdf, and one of them is sitting in your spam folder.
Email makes this harder in three ways. Attachments hit size limits, so a year of scanned statements may not go through at all (we cover the limits in how to receive large files from clients). Files arrive in no particular order, with no record of what's still missing. And bank statements and tax returns sit in inboxes indefinitely.
The time adds up quickly. If chasing and refiling cost you four hours per new client and you take on 20 clients a year, that's two full working weeks of admin, before counting the monthly documents that keep arriving the same way.
The fix is one upload link. The client opens it, adds every document, and the files arrive in your cloud storage already sorted by client and by category.
How to collect every onboarding document with one link
EZ File Drop puts an upload form in front of the cloud storage your firm already uses. You build the onboarding form once, reuse it for every new client, and each client's documents arrive in their own folder, sorted by category.
1. Connect your cloud storage
In the left sidebar, click Cloud Connections and connect the storage your firm uses. Nothing moves: files arrive where your client folders already live. See connect Google Drive for a walkthrough.
2. Build the onboarding form
Click Upload Forms, then Create upload form, and name it something like "New Client Onboarding." Add fields for the client's name, email, and business name. You'll use the business name to sort files in step 4. See create your first upload form.
3. Give each document category its own page
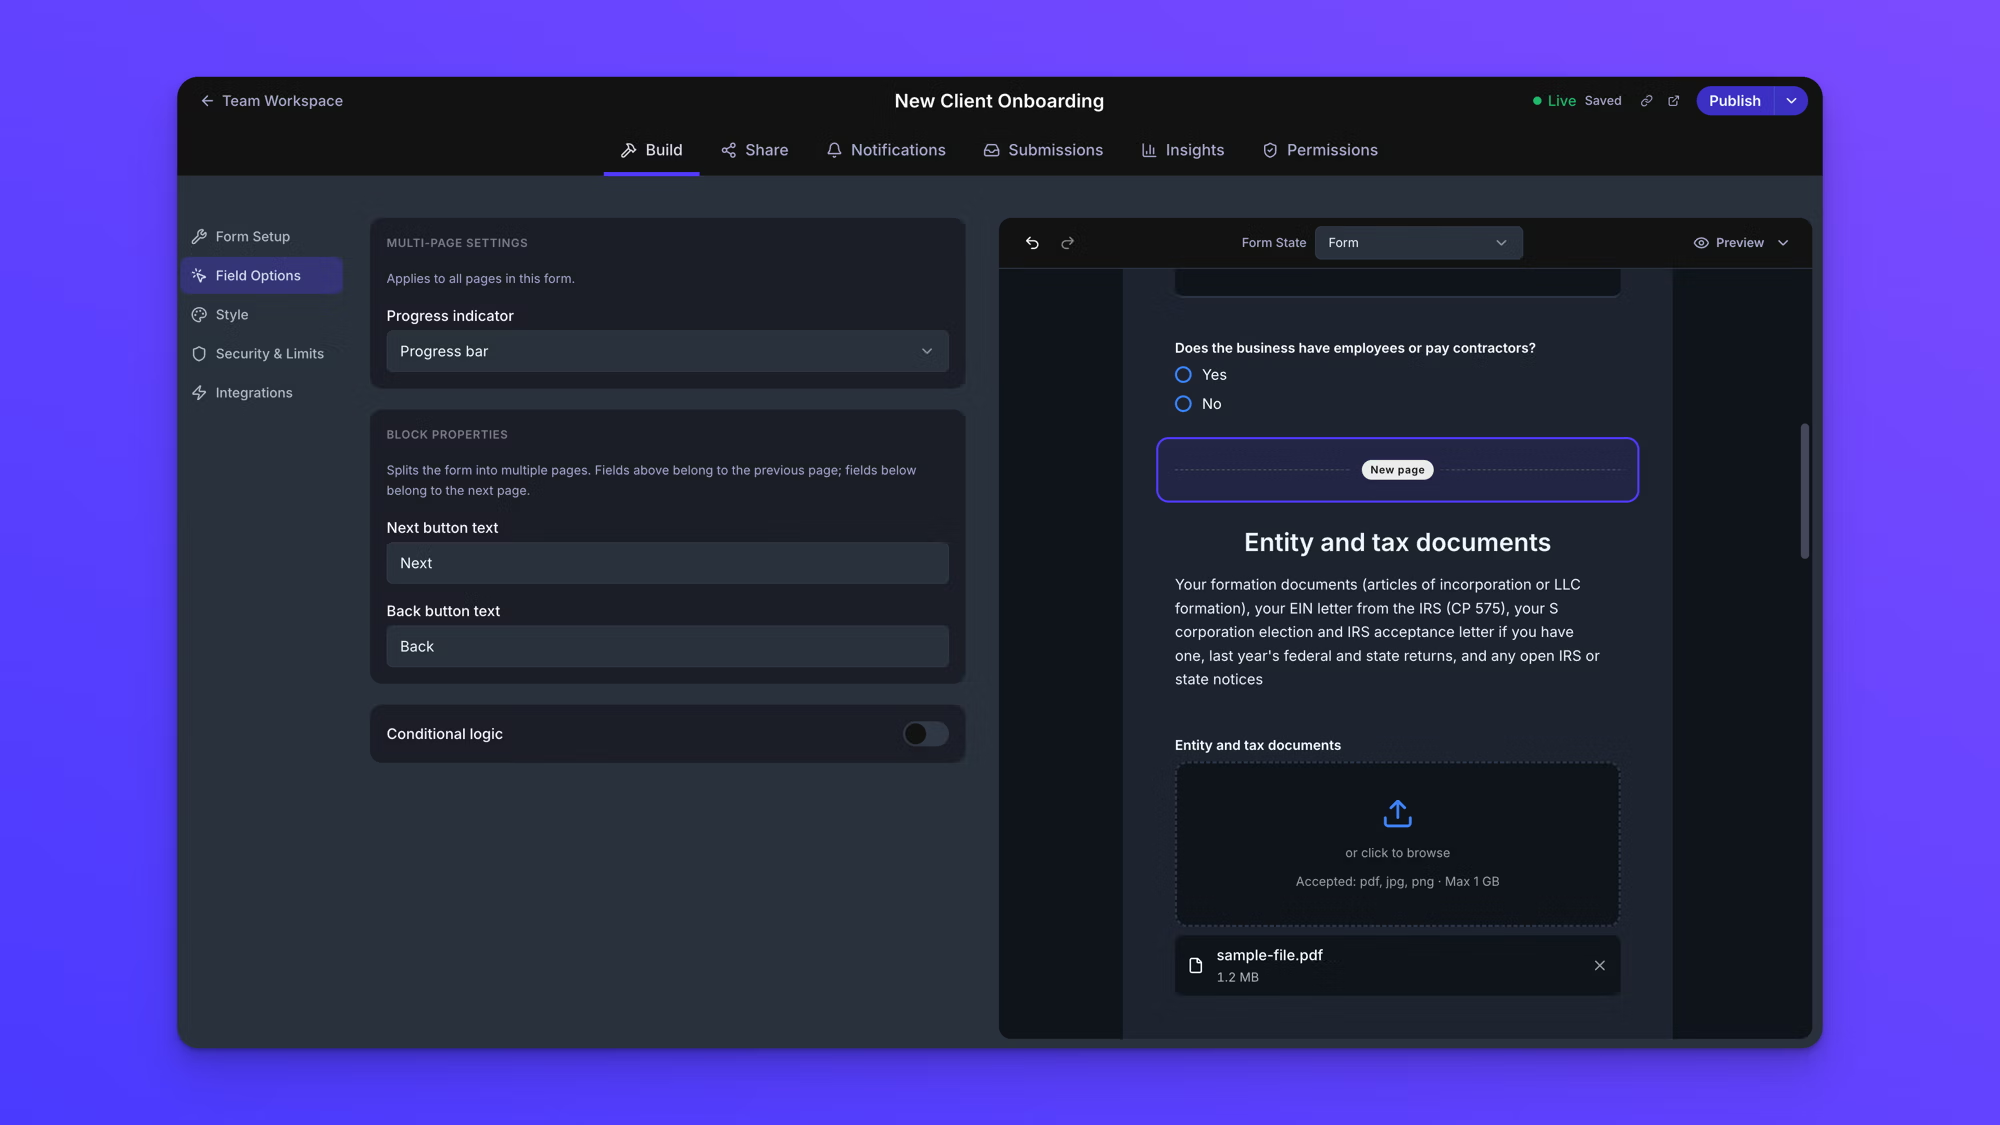
Twenty-five documents on one screen is a lot to ask. Break the form into pages with the New Page block: the client details on page one, then one page per category from the table above. Give each page a short Text block listing what belongs there, then a File Upload field for it. Set Progress indicator to Progress bar so clients can see how far along they are.
Leave the upload fields optional. Clients rarely have everything on day one, and they can send the rest later through the same link. In each field's Upload Field Settings, set Allowed extensions to the formats you accept, such as pdf, jpg, png, xlsx, and csv. See multi-page forms and restrict file types and set upload limits.
Not every client runs payroll. Add one question to page one, such as "Does the business have employees or pay contractors?", and use Conditional logic on the payroll page's New Page block so that page only appears for a Yes. Multi-page forms, multiple upload fields, and conditional logic are on the Business and Premium plans.
4. Send each category to its own folder
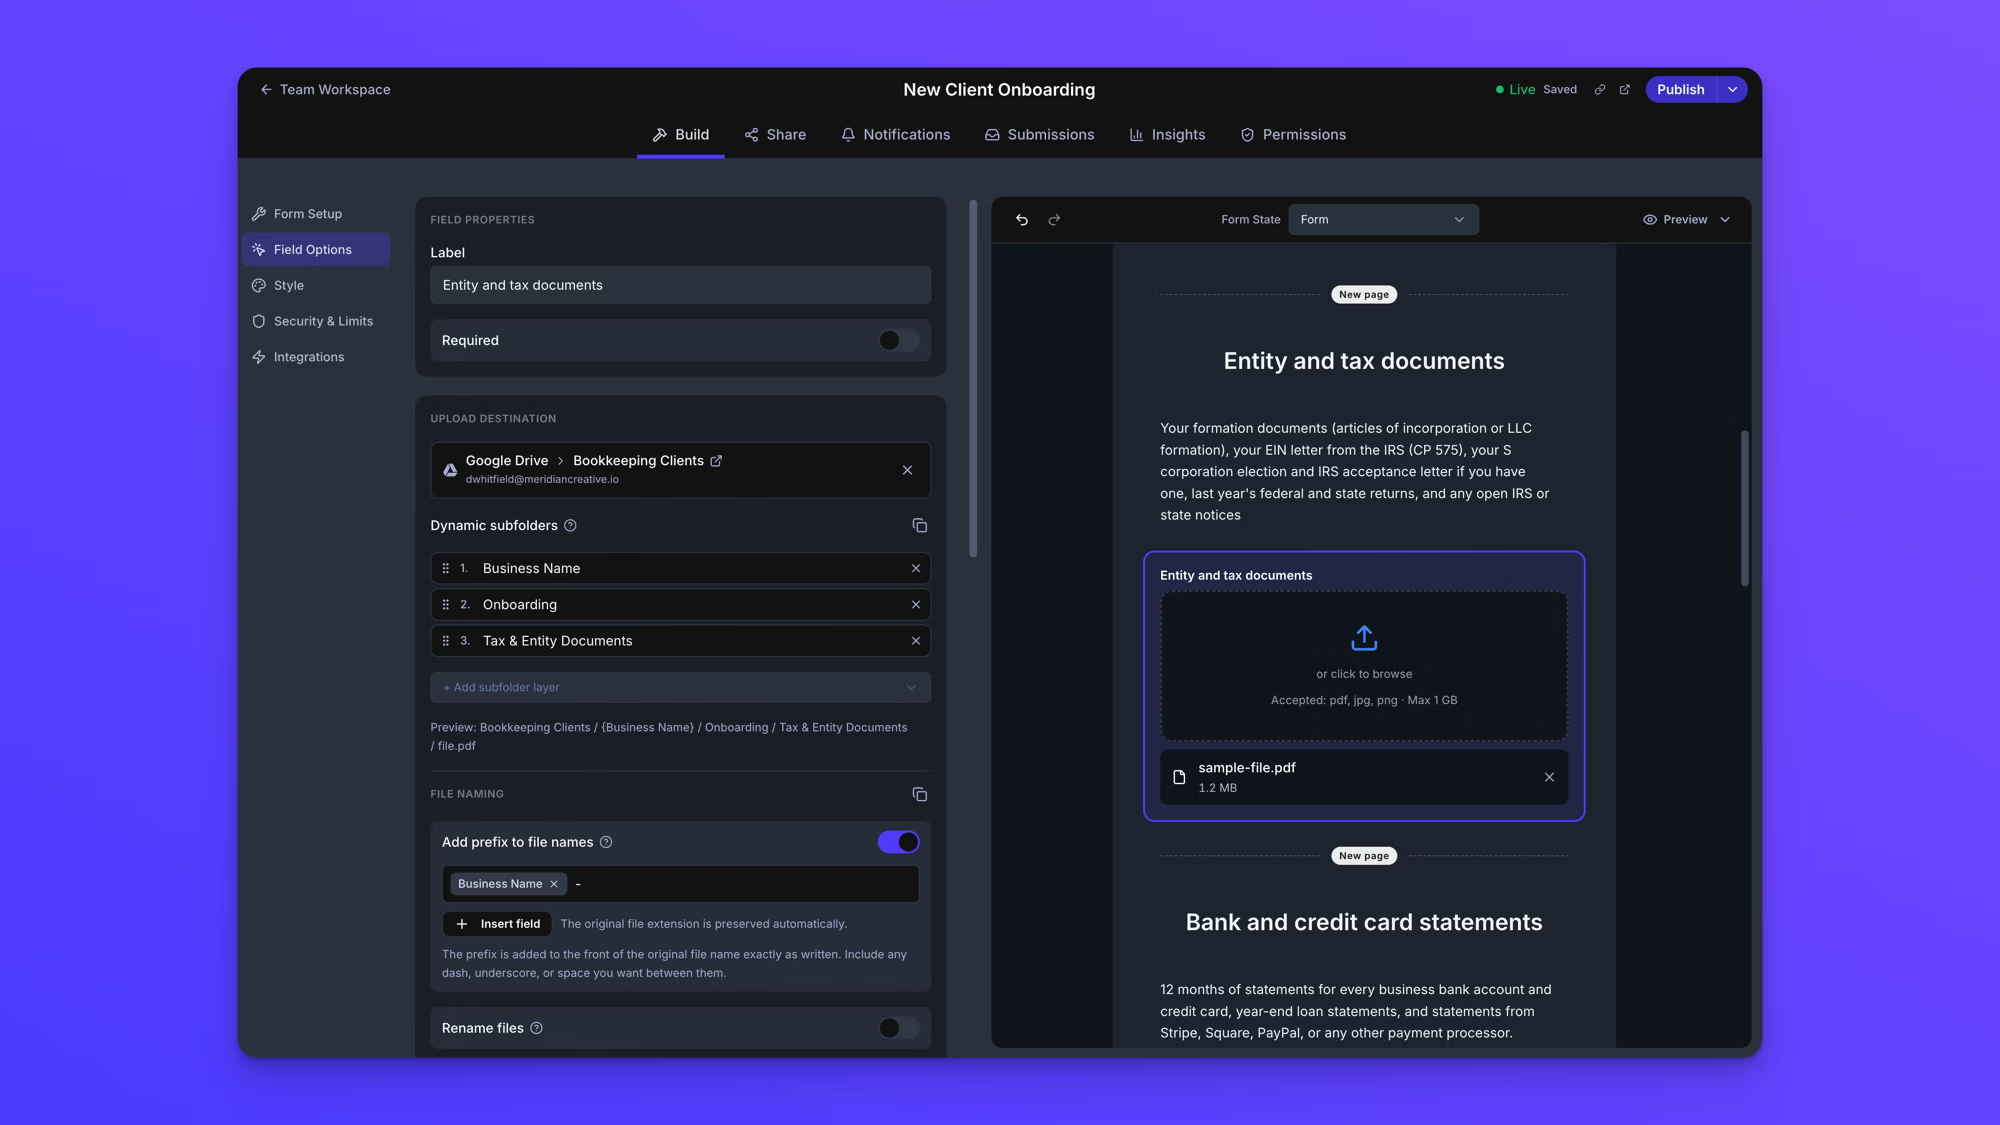
Each File Upload field has its own Upload Destination, in that field's Field Options. Set the destination folder to your clients folder, then click + Add subfolder layer three times:
- The Business Name field, so every client gets their own folder.
- A New Folder (custom name) layer called "Onboarding."
- A second custom-name layer named for that field's category, such as "Tax & Entity Documents."
Repeat for each upload field with its own category name. In File Naming, turn on Add prefix to file names, insert the Business Name field, and type a space, dash, and space after it, so every file says whose it is even if it's moved later. If a client's folder already exists, new files go into it rather than creating a duplicate. Folder sorting and file naming are on the Business and Premium plans. See dynamic file organization.
5. Turn on notifications and share the link
On the Notifications tab, have EZ File Drop email you when a submission arrives, with the form answers and the list of files, and send the client a confirmation. See email notifications.
Click Publish, open the Share tab, and click Copy URL. The link goes in your document request at step 4, and the same form can be embedded on your firm's website.
What the client sees, and where the files go
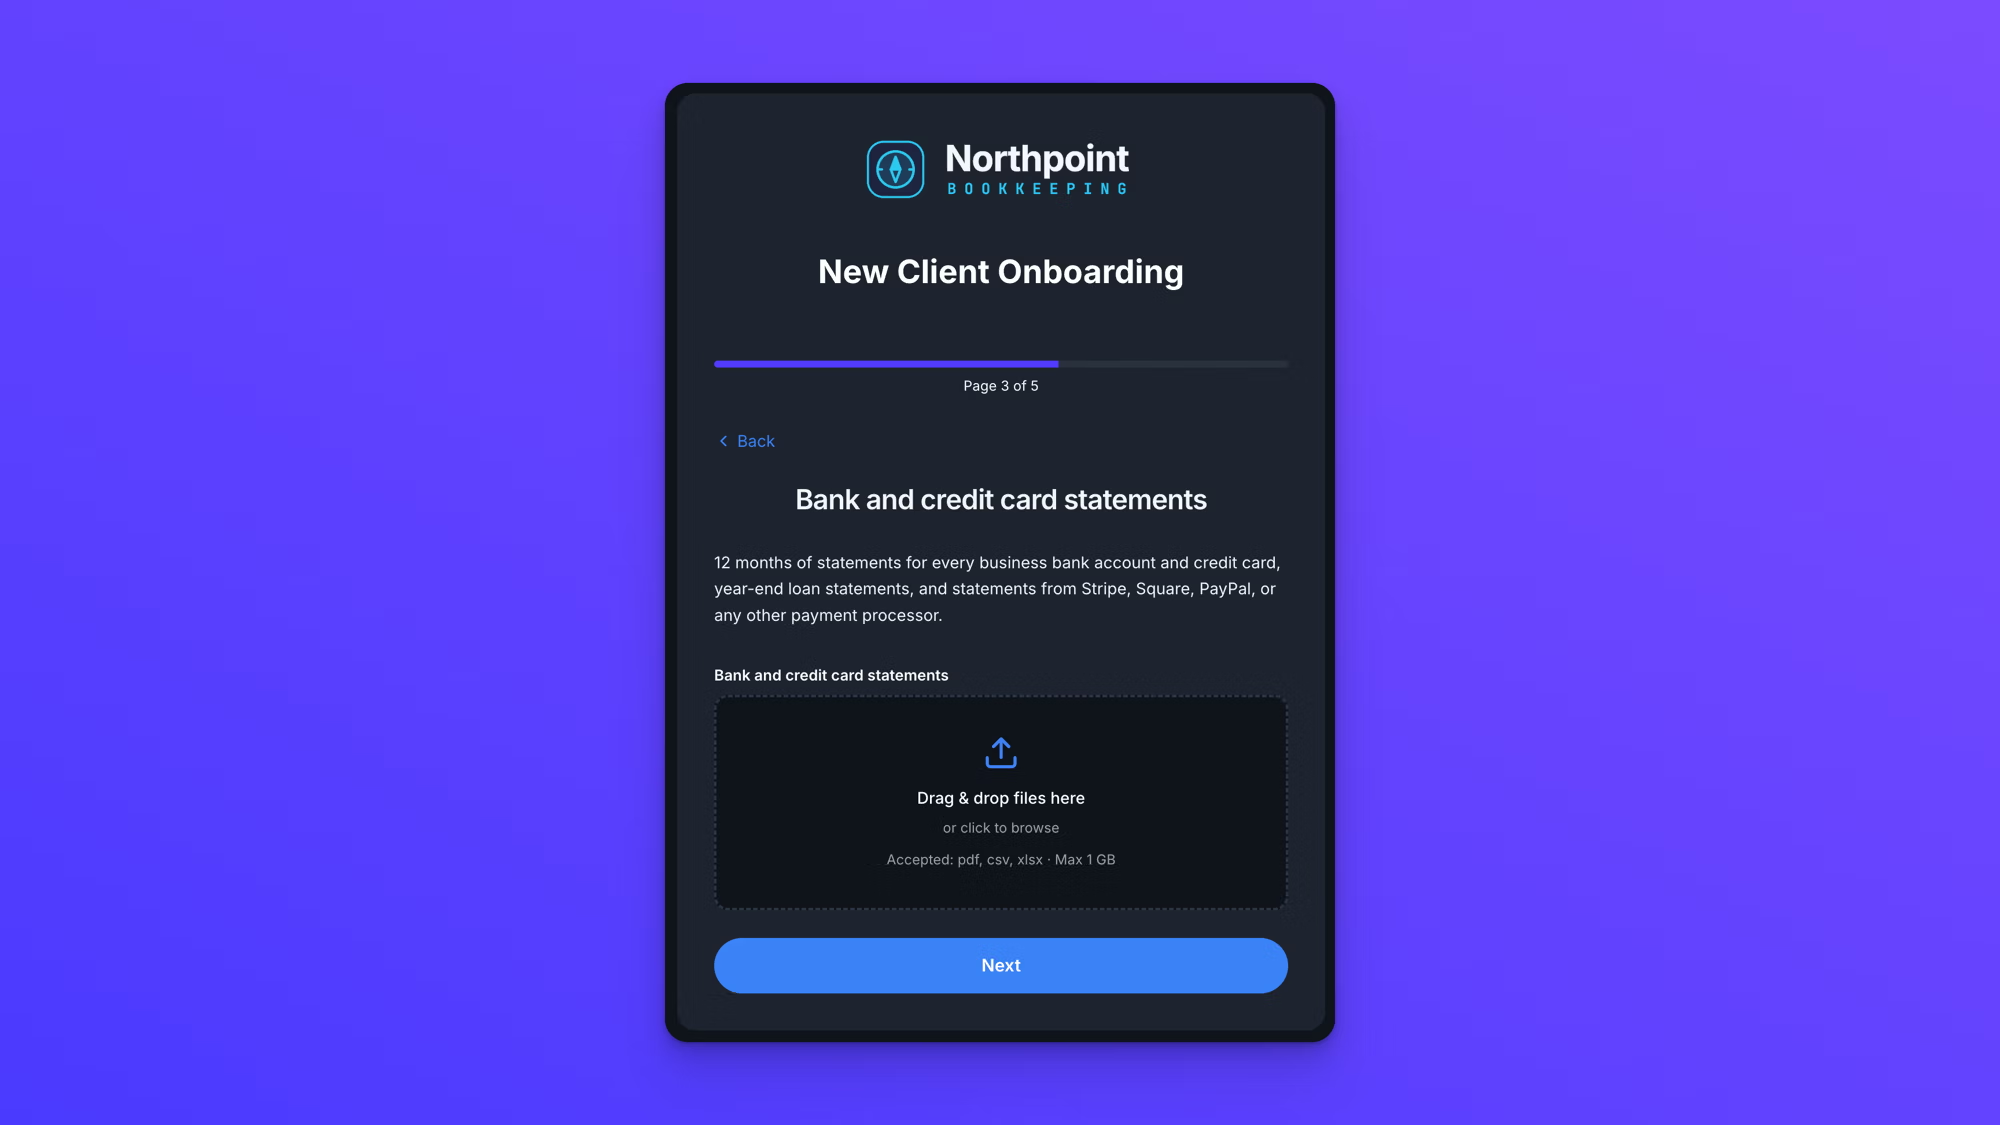
Your new client gets one email with one link. They open it on a phone, tablet, or computer, with no app to download and no account to create, move through the pages one category at a time, and submit. The files are then delivered to your storage like this:
- Bookkeeping Clients
- Brightline Coffee
- Onboarding
- Tax & Entity Documents
- Brightline Coffee - EIN letter.pdf
- Brightline Coffee - 2025 return.pdf
- Banking & Statements
- Brightline Coffee - Chase checking Jan-Dec.pdf
- Tax & Entity Documents
- Onboarding
- Brightline Coffee
When the client sends the missing statements a week later through the same link, they go into the same folders.
Try the sample form yourself
Keeping financial documents secure
Files travel over an encrypted connection and pass through EZ File Drop only in transit on their way to your storage. Nothing is kept long-term on our side, and the connection to your storage uses OAuth, so your password is never shared with us. To control who can reach the form, you can password-protect it. For the full picture, see our security page.
Branding, folder sorting, and multiple upload fields are on the Business and Premium plans, and the 7-day free trial runs on Business, so you can build and test the whole onboarding form before you pay.
A folder structure for new bookkeeping client files
A consistent folder structure across clients makes everything downstream faster: tax season, staff handoffs, and looking up prior periods. Here's a structure that works for most practices:
- Clients
- [Client business name]
- Onboarding
- Tax & Entity Documents
- Banking & Statements
- Bookkeeping Records
- Payroll
- Operational
- [Year]
- Bank Statements
- Credit Card Statements
- Receipts
- Reports
- Tax Documents
- Engagement & Communications
- Onboarding
- [Client business name]
With the form from the setup steps, the whole Onboarding branch fills itself as clients submit. For the monthly documents that follow, a second standing form can sort by client the same way, and a Submission Date layer can group files by when they arrived.
Common bookkeeping onboarding mistakes
- Treating every onboarding as a custom project. The first few clients deserve a custom touch. The thirtieth doesn't. If your process changes every time, the issue isn't your clients; the firm doesn't have a system yet. Write it down once and run every new engagement through it.
- Letting the client choose how to send documents. This one choice decides whether onboarding runs cleanly. Email, photos by text, links from the client's personal cloud account, paper dropped at the office: every method a client picks is a method you have to support. Set the standard at onboarding: one link, one place, every time.
- Asking for everything in one wall of text. A single email listing 25 documents is overwhelming. Split the request into the categories above so the client can work through one batch at a time.
- Skipping the 30-day check-in. Onboarding needs a clear end. If you don't define when it's done, it never is.
Frequently asked questions
How long should bookkeeping client onboarding take?
For a small business with reasonably clean records, plan on one to two weeks for setup and document collection, then two to four weeks of catch-up. Onboarding ends at the 30-day check-in, once the first clean monthly close is done. Messy books or missing documents push it longer.
What documents do I need from a new bookkeeping client?
At minimum: entity formation documents, the IRS EIN letter, prior-year tax returns, 12 months of bank and credit card statements, the prior-year P&L and balance sheet, the current chart of accounts, payroll records if they have employees, and a vendor list with W-9s. Ask for them grouped by category so the client can work through one batch at a time.
How can I make bookkeeping client onboarding faster?
Fix document collection first, since it's where most of the waiting happens. Give clients one upload link with a field for each document category instead of an email list. Then template the engagement letter and intake form, standardize your chart of accounts setup, and hold the 30-day check-in so onboarding has a firm end.
What's the difference between a bookkeeping client intake form and an onboarding checklist?
The intake form is one form the client fills out at the start, capturing basics like legal entity name, EIN, software, and prior accountant. The onboarding checklist is the full workflow that follows: engagement letter, document collection, software setup, catch-up, and the first clean monthly close.
How can bookkeepers collect client documents without email?
Use an upload form at a single link. The client opens it, adds every document with no account or app, and the files are delivered into your own cloud storage in a folder for that client. EZ File Drop does this, and on Business and Premium each document category can go to its own subfolder.
How do you onboard a bookkeeping client remotely?
The same way as in person, with digital handoffs. The client signs the engagement letter electronically, completes the intake form online, uploads documents through one link, and shares accountant access in QuickBooks Online, Xero, or whatever platform they use. The whole process can run without meeting in person.
Make onboarding a system
A bookkeeping client onboarding checklist is the structure. Document collection is where it usually breaks, and one upload link that sorts every file by client and category is the simplest fix we know. Copy the checklist above into your firm's onboarding doc, try the sample form to see it from the client's side, and try EZ File Drop for free with no credit card required.
Written by Matt Townley