4 Easy Ways to Upload Files to Google Drive
Google Drive is one of the most widely used cloud storage platforms, and there's more than one way to get files into it. The right method depends on what you're actually trying to do.
If you're uploading your own files, three built-in Google methods cover most situations: the web interface, the Google Drive desktop app, and the mobile app. Each is fast and free. The right pick depends on file size, how often you're uploading, and which device you're working from.
If you need other people to upload files to your Drive, those three methods don't help. None of them work without a Google account, and giving someone Editor access to a folder creates real privacy issues. There's a fourth option for that case, covered at the end.
Below are all four methods, when each one fits, and a comparison table to help you decide.
Quick Comparison
Method 1: Upload Through the Google Drive Web Interface

The web interface is the most universal option. It works on any computer with a browser and a Google account. No software installation, no setup beyond signing in. Best for occasional uploads from a shared or new computer where installing software isn't an option, or when you don't have the Google Drive desktop app installed.
Step-by-Step Guide
- Open a web browser and go to drive.google.com.
- Sign in to your Google account.
- Click "New" in the top-left corner, then choose "File upload" or "Folder upload."
- Select the file or folder from your computer.
- The upload progress shows in the bottom-right of the screen. When it finishes, the file appears in your current Drive folder.
You can also drag and drop files from your computer's file browser directly into the Google Drive web interface. Files land in whatever folder is currently open in Drive.
Pros and Cons
Pros:
- Fast and easy for one-time uploads
- Works on any computer with internet access
- Allows drag-and-drop uploads directly into your Drive folder
- Resumes interrupted uploads automatically when your connection comes back
Cons:
- Requires manual uploads every time
- No automatic syncing for ongoing updates
- Browser must stay open and connected during upload
Google Drive supports files up to 5 TB on paid plans (Workspace and Google One). Free Google accounts get 15 GB of total storage shared across Drive, Gmail, and Photos. If you're uploading multiple files at once, the web interface handles batches well.
Method 2: Google Drive for Desktop
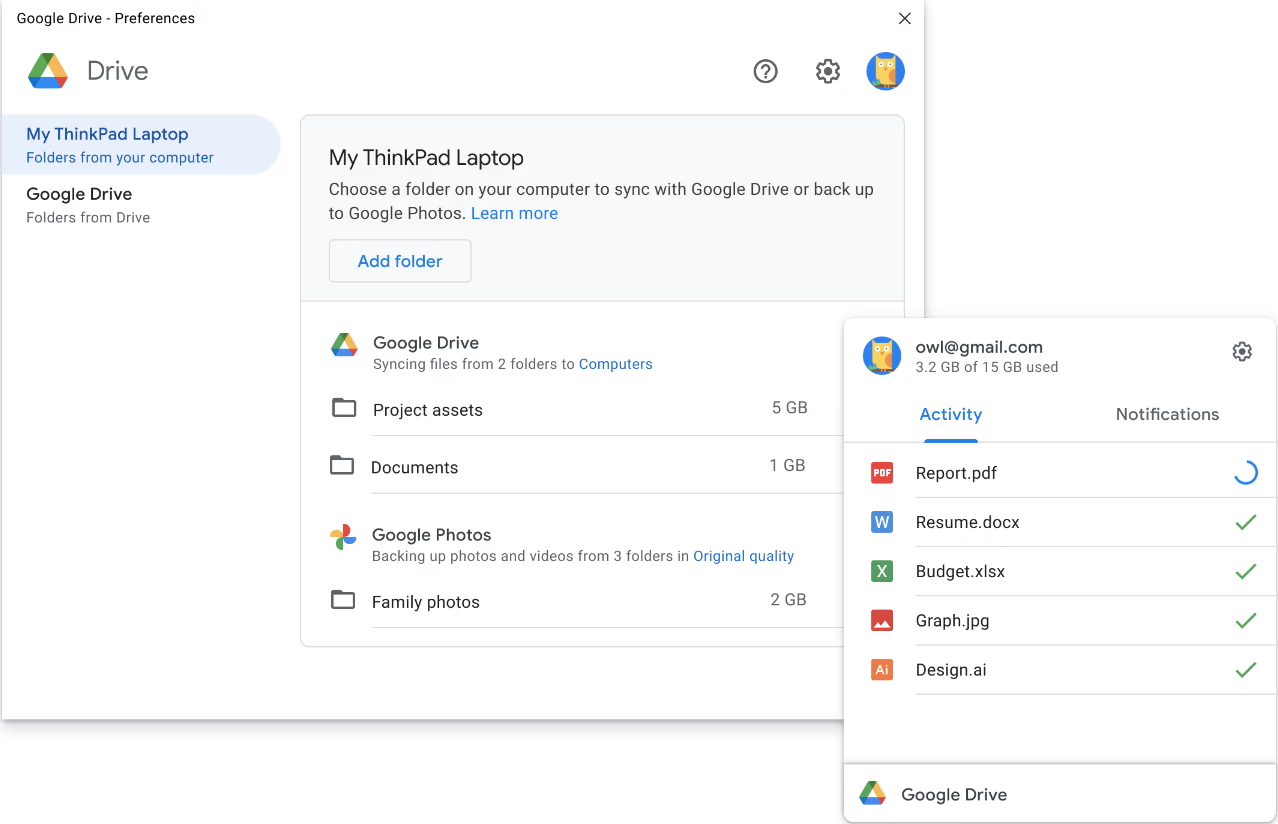
Google Drive for Desktop (formerly Backup and Sync) is Google's free desktop app for Windows and Mac. It creates a Google Drive folder on your computer that syncs automatically with your Drive in the cloud. Best for frequent uploads, working with large files, or when you want certain folders on your computer to stay synced with Drive automatically.
Step-by-Step Guide
- Download Google Drive for Desktop from google.com/drive/download.
- Install and sign in to your Google account.
- Choose which folders to sync: you can sync everything in your Drive, or just specific folders.
- To upload a file, drag it into the Google Drive folder on your computer. The app uploads it in the background.
- Files appear in your cloud Drive within seconds, depending on file size and connection speed.
Drive for Desktop runs continuously in the background, uploading files as you save them to the synced folder. There's no need to open a browser or click "Upload." For workflows where you're saving project files, screenshots, or documents to Drive throughout the day, this is the most efficient option.
Pros and Cons
Pros:
- Automatic syncing keeps your files always up to date
- Works seamlessly with your computer's file system for drag-and-drop uploads
- Enables file transfer to Google Drive without needing to open a browser
- Most efficient method for ongoing work where files change frequently
Cons:
- Uses local storage space (unless you use streaming mode)
- Requires initial setup and folder configuration
- Initial sync for large Drives can take a while
Drive for Desktop also supports streaming mode, where files stay in the cloud and only download when you open them. This saves disk space if you have a lot of Drive content but don't need it all locally. Same 5 TB per file ceiling as the web interface.
Method 3: Upload via the Google Drive Mobile App

The Google Drive mobile app for iOS and Android lets you upload files from your phone or tablet. This is the right choice for photos, documents scanned with the phone camera, or any file already on your mobile device. Best for uploading photos and videos from a phone, scanning documents with the phone camera, or uploading files you've received via email or messaging on your phone.
Step-by-Step Guide
- Download the Google Drive app from the App Store (iOS) or Play Store (Android).
- Sign in to your Google account.
- Open the app and tap the "+" button in the bottom-right corner.
- Choose "Upload" and select the file from your phone.
- The file uploads in the background. You can leave the app while it finishes.
The app can upload entire photo libraries from your phone's camera roll at once. The Drive mobile app also has a built-in document scanner: tap the "+" button and choose "Scan" to photograph a document and convert it to a PDF in one step.
Pros and Cons
Pros:
- Convenient for uploading from anywhere
- Perfect for photos, videos, and scanned documents
- Built-in document scanner converts photos to PDFs
- Enables quick file sharing right from your device
Cons:
- Cellular uploads can use a lot of mobile data
- Organization is more limited than the desktop interface
- Doesn't preserve folder structure when uploading multiple files
For large files (high-resolution video, for example), connect to Wi-Fi first to avoid burning through your data plan. Same 5 TB per file ceiling as the other Google methods.
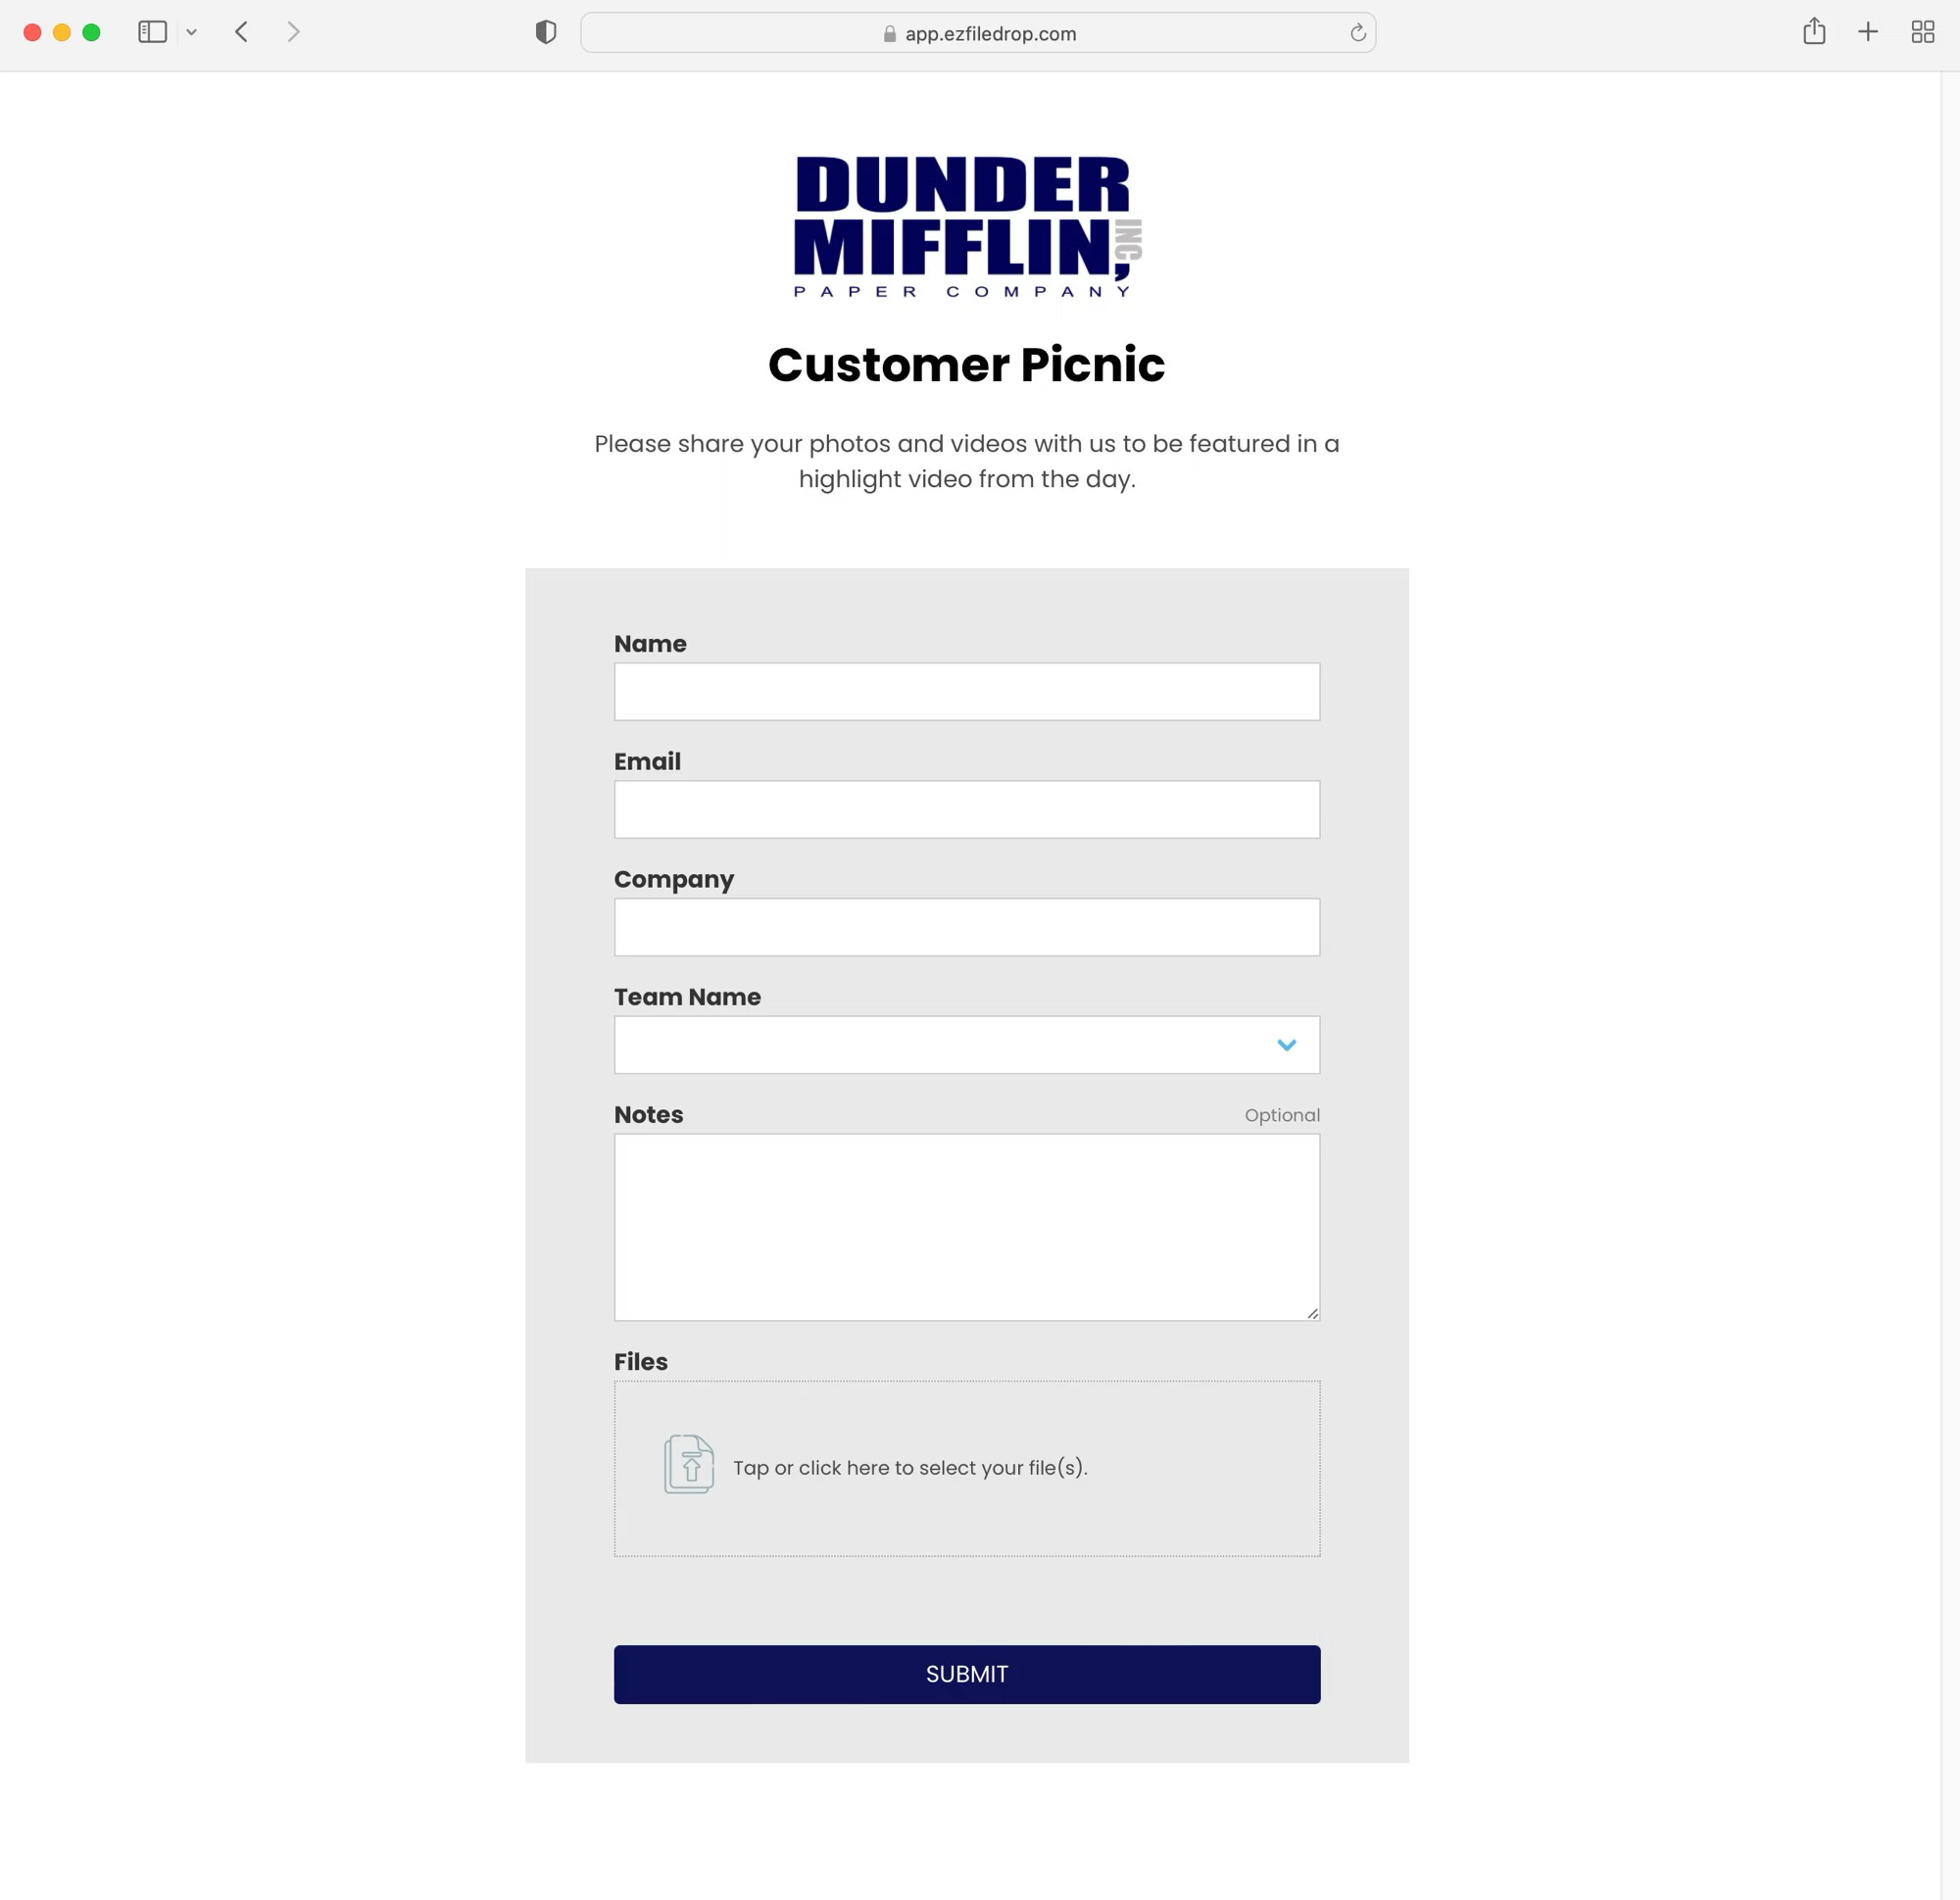
Method 4: Use EZ File Drop to Let Others Upload to Your Drive
Methods 1–3 are for uploading your own files. They all require the uploader to have a Google account, which means they don't work for collecting files from clients, contractors, vendors, or anyone outside your organization.
EZ File Drop is a third-party tool built specifically for this case. It connects to your Google Drive and gives you a branded upload form that anyone can use without signing in. Files arrive directly in your Drive folder, organized however you specify. Best for receiving files from people who don't have Google accounts, professional workflows where the upload experience needs to feel branded, or any case where you need to collect context (name, email, project info) alongside the files.
Step-by-Step Guide
- Sign up for EZ File Drop and connect your Google Drive via OAuth2 (your Google password never leaves Google).
- Build an upload form with your logo, colors, custom form fields, and the destination folder in Drive.
- Share the form link or embed it on your website.
- Anyone can upload through the form without a Google account. Files land in your specified Drive folder.
For the full walkthrough, see our guide on letting anyone upload to Google Drive without signing in.
Pros and Cons
Pros:
- The only method that works without requiring uploaders to have Google accounts
- Branded upload experience (your logo, colors, custom form fields)
- Files auto-organize into subfolders based on form field data
- Embeddable on any website (WordPress, Webflow, Wix, Squarespace)
- Submission data can sync live to a Google Sheet
Cons:
- Requires a paid subscription ($9–$99/month, with a 7-day free trial)
- Best suited for receive-side workflows, not your own uploads
- Adds a third-party tool to your stack
The tradeoff: Methods 1–3 are free with any Google account and handle uploading your own files. EZ File Drop is a paid tool that handles a different problem: letting others upload to you. Don't pay for EZ File Drop if Methods 1–3 cover your use case.
Which Method Should You Use?
The decision depends on three questions:
Are you uploading your own files or collecting from others? If your own, use Methods 1–3. If collecting from others, Method 4 is the only one that works without sign-in.
Are you uploading frequently or occasionally? Frequent uploads benefit from Method 2 (Drive for Desktop) because it runs in the background. Occasional uploads work fine with Method 1 (web interface).
Are you on a phone or computer? Phones use Method 3. Computers use Method 1 or 2.
For most personal use cases, Method 2 (Drive for Desktop) is the workhorse. It handles 90% of upload scenarios efficiently and stays out of your way. For one-off uploads from a shared computer, Method 1 (web) is fastest. For phone-based uploads, Method 3.
For professional file collection from clients, vendors, or external collaborators, Method 4 (EZ File Drop) is the only option that works without requiring uploaders to have Google accounts.
Tips for Managing Your Google Drive
Organize as you upload, not after. Whichever method you use, the most efficient time to file uploads into the right folder is at upload time, not later. Methods 1–3 let you choose the destination folder before uploading. Method 4 (EZ File Drop) can use form field data to automatically organize uploads into subfolders.
Use Drive for Desktop's selective sync. If you have a lot of Drive content but limited local disk space, Drive for Desktop's streaming mode (or selective folder sync) keeps everything available without filling up your hard drive.
Check storage usage occasionally. Free Google accounts get 15 GB shared across Drive, Gmail, and Photos. Paid plans (Google One) start at 100 GB. If uploads start failing, check your storage at one.google.com/storage.
For mobile uploads, use Wi-Fi for large files. Cellular data uploads work but burn through data plans quickly. For files over a few hundred MB, connect to Wi-Fi first.
Frequently Asked Questions
What's the maximum file size I can upload to Google Drive?
Google Drive supports files up to 5 TB on paid Google Workspace and Google One plans. Free accounts get 15 GB of total storage shared across Drive, Gmail, and Photos, so individual file size is limited only by your remaining storage. For very large files, the upload time depends on your internet connection speed.
Can I upload files to Google Drive without a Google account?
Not directly through Google's tools. Methods 1, 2, and 3 all require a Google account. If you need to receive files from someone without a Google account, you can use a third-party tool like EZ File Drop, which gives you a branded upload form that anyone can use without signing in. Files still land in your Google Drive.
What happens if my upload fails halfway through?
Google Drive's web interface and Drive for Desktop both support resumable uploads. If your connection drops mid-upload, the upload resumes from where it stopped when the connection comes back. The mobile app also retries automatically.
Can I upload an entire folder at once?
Yes. The web interface has a "Folder upload" option that uploads a complete folder structure in one operation. Drive for Desktop syncs entire folders automatically once you set them up. The mobile app uploads multiple files at once but doesn't preserve folder structure.
How do I upload files to a specific folder in Google Drive?
In the web interface, navigate to the folder first, then upload — files land in whatever folder you have open. In Drive for Desktop, drag files into the specific folder on your computer. In the mobile app, navigate to the folder before tapping the "+" button. With EZ File Drop, you specify the destination folder when you build the upload form, and every submission through that form lands in that folder.
Can I upload large video files to Google Drive?
Yes. Google Drive supports video files up to the 5 TB per-file limit. For best results, upload large videos over Wi-Fi rather than cellular data, and use Drive for Desktop or the web interface rather than the mobile app for very large files.
Final Thoughts
There are four practical ways to upload files to Google Drive: the web interface, the desktop app, the mobile app, and a third-party tool for cases where someone else needs to upload to your Drive without a Google account. The right method depends entirely on what you're trying to do.
For your own uploads, Google's three built-in methods cover everything. For collecting files from people who don't have Google accounts, EZ File Drop is the most direct way to do it. The same workflow also works for letting anyone upload to Dropbox or OneDrive without signing in if those fit your stack.
You can try EZ File Drop for free with no credit card required.
Written by Eric Stracke
Try EZ File Drop Today!
Start Free TrialIntegrations
EZ File Drop + Google DriveEZ File Drop + DropboxEZ File Drop + OneDriveEZ File Drop + BoxStay in Touch


