How to Create a WordPress File Upload Form Without a Plugin
There's no shortage of WordPress plugins that add file upload forms: WPForms, Jetpack Forms, Formidable, Gravity Forms. Each lets you drop a file upload field into a contact form and ship it to your WordPress site. For many use cases, that's fine.
For a lot of others, though, installing yet another plugin to collect files is overkill. Plugins add server load, increase your site's attack surface, and often require paid tiers to unlock file uploads at all. And they all share the same underlying limitation: files land on your WordPress server, where PHP upload limits and hosting storage quotas apply.
There's a simpler alternative. Use an embedded form that routes files directly into your existing cloud storage (Google Drive, Dropbox, OneDrive, Box, or FTP), without a plugin, without a database table, and without any of the file size limits imposed by your WordPress host.
This guide walks through how to do that using EZ File Drop, covering native WordPress (block editor), Divi, and other page builders.
Why You Might Want to Skip the Plugin
The plugin approach to WordPress file uploads comes with tradeoffs worth knowing about:
PHP upload limits. WordPress is subject to the PHP upload_max_filesize and post_max_size directives set by your host. On shared hosting, these are often 10 MB to 40 MB. Raising them usually requires editing PHP configuration files or contacting support. Any plugin that uploads directly to your server inherits this limit.
Server storage strain. Files uploaded through a plugin typically land in /wp-content/uploads/ on your server. A hundred client submissions of video files can consume your hosting storage quota fast, and backups balloon accordingly.
Plugin bloat. Every active plugin adds code that executes on every page load. File upload plugins in particular often bundle unused features (email templates, payment integrations, conditional logic engines) that you don't need but ship with the plugin anyway.
Security attack surface. Each plugin is a potential vector for vulnerabilities. File upload plugins are a particularly sensitive category because they accept user-provided files, which is exactly what attackers want.
Subscription costs. Most of the popular file upload plugins gate the file upload field behind paid tiers. WPForms' file upload field requires the Basic plan ($49.50/year and up). Jetpack Forms requires a paid Jetpack plan for file uploads. Formidable's upload field is Plus-tier or higher.
The plugin-free alternative routes file uploads off your WordPress server entirely. Files go directly from the uploader's browser to the cloud storage destination you choose (Google Drive, Dropbox, OneDrive, Box, or FTP). WordPress only hosts the embed code. This means no upload limits, no server storage strain, no plugin to maintain, and no subscription beyond the file-upload tool itself.
The Short Version
Three steps:
- Create a file upload form in EZ File Drop and copy the embed code.
- Open the WordPress page or post where you want the form to appear.
- Paste the embed code into a Custom HTML block (or a Code module, depending on your editor).
Details below, including step-by-step for the block editor and for Divi.
Step 1: Create the Form in EZ File Drop
Sign up at ezfiledrop.com/join. Every new account starts on a 7-day Business plan trial with 1 GB of upload bandwidth, no credit card required.
Connect EZ File Drop to your cloud storage of choice (Google Drive, Dropbox, OneDrive, Box, or FTP) through the Cloud Settings menu. Then open Upload Forms and click Create New Form to launch the form editor.
Configure the form:
- Upload your logo and set page copy (header and welcome message)
- Customize colors and fonts to match your site
- Add any form fields you want (name, email, project details, dropdowns, etc.)
- Select the cloud destination folder for incoming files
- Set file size and type restrictions as needed (up to 150 GB per file on any plan)

For a full walkthrough of form setup, see How to Create Your First Upload Form in EZ File Drop.
Step 2: Copy the Embed Code
Once your form is saved, click the three-dot menu next to the form in your dashboard and select Get Embed Code (or open the form in the editor and click Embed Code in the left menu). The embed code is a short snippet of HTML plus a <script> tag that loads the form from EZ File Drop's servers.
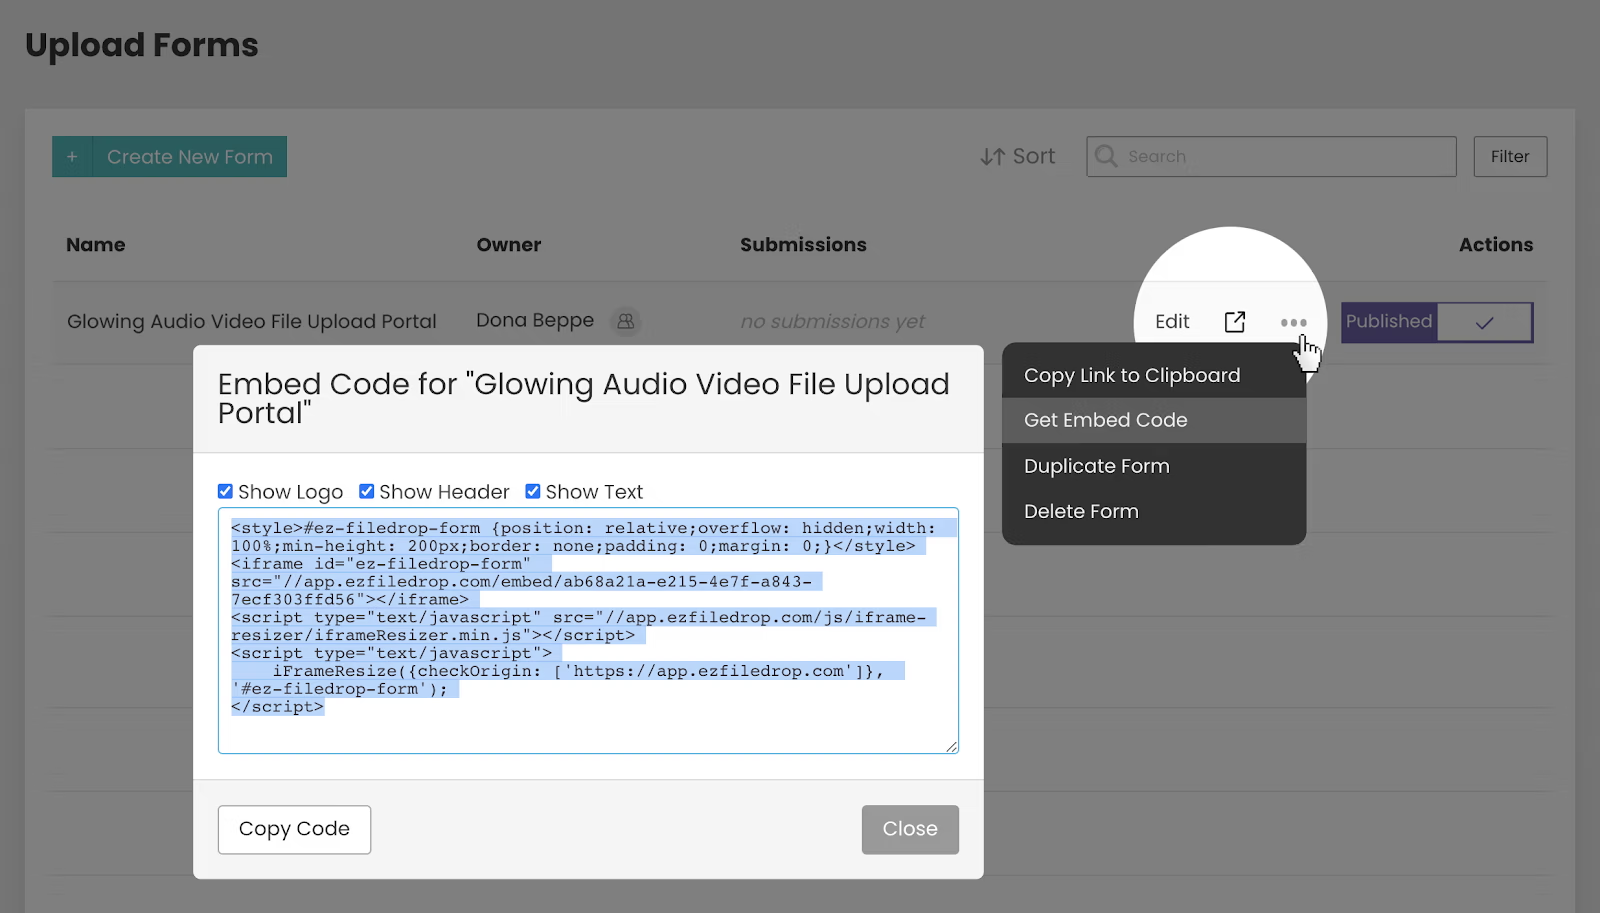
Three toggles control what appears in the embedded version:
- Show Logo: displays your logo above the form. Turn off if your WordPress page already has a logo or header nearby.
- Show Header: displays the page header text.
- Show Page Text: displays the welcome message.
For embedding inside existing WordPress page content, most people turn all three off and let the surrounding WordPress page provide context. The form itself (fields plus drop zone plus submit button) shows up on its own, clean.
Click Copy Code to grab the snippet.
Step 3: Paste the Embed Code into WordPress
WordPress has several editing environments depending on which setup you're using. The three most common are covered below. Pick the one that matches your site.
Option A: Block Editor (Gutenberg)
If you're using the default WordPress block editor (no page builder installed), this is the simplest path.
- Open the page or post where you want the form in the block editor.
- Click the + button to add a new block.
- Search for Custom HTML and select it.
- Paste the EZ File Drop embed code into the Custom HTML block.
- Click Preview to verify the form appears, then Update or Publish the page.
The Custom HTML block is WordPress's built-in way to handle raw HTML, <script> tags, and third-party embeds. It's part of core WordPress, not an add-on. No plugin needed.
Important compatibility note: This approach works on self-hosted WordPress.org sites and on WordPress.com Business plans and above. It does NOT work on WordPress.com Free, Personal, or Premium plans, which strip <script> tags from Custom HTML blocks for security reasons. If you're on WordPress.com, check your plan before troubleshooting.
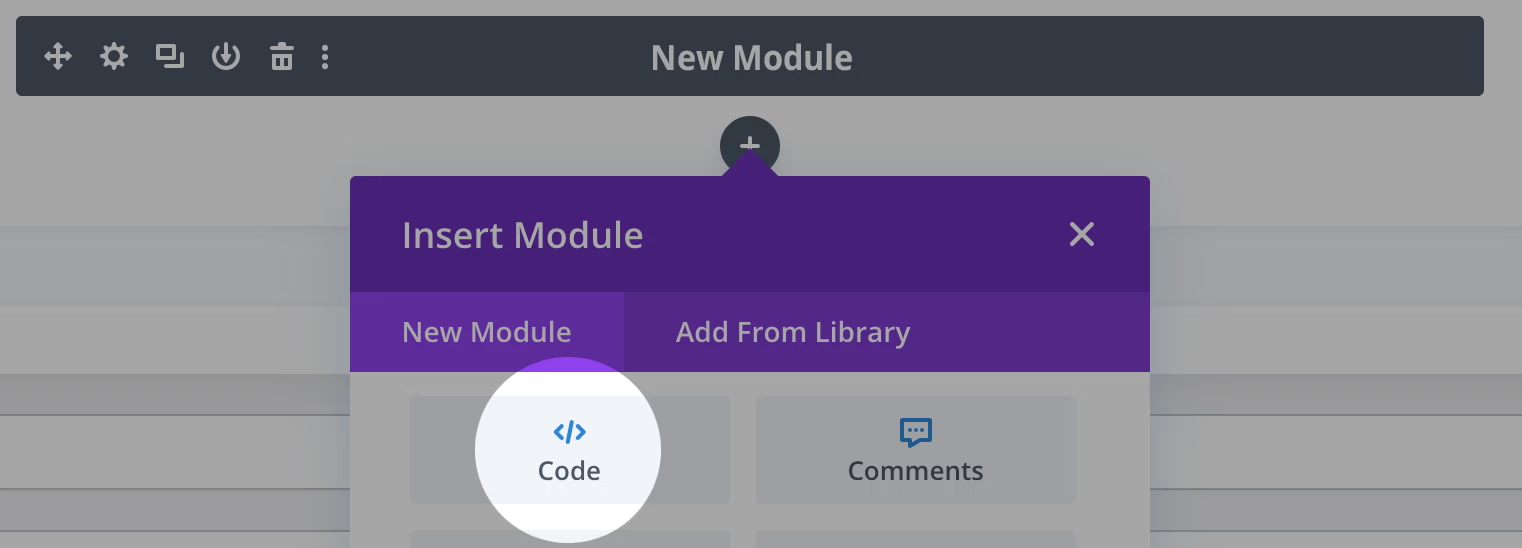
Option B: Divi Page Builder
Divi is one of the most widely used WordPress page builders. If your site uses Divi, the embed goes into a Code module.
- Open the page in Divi Builder.
- Click the + button to add a new module.
- In the module picker, search for or click the Code module.
- The Code module opens with a Content tab that has a single code field. Paste the EZ File Drop embed code into that field.
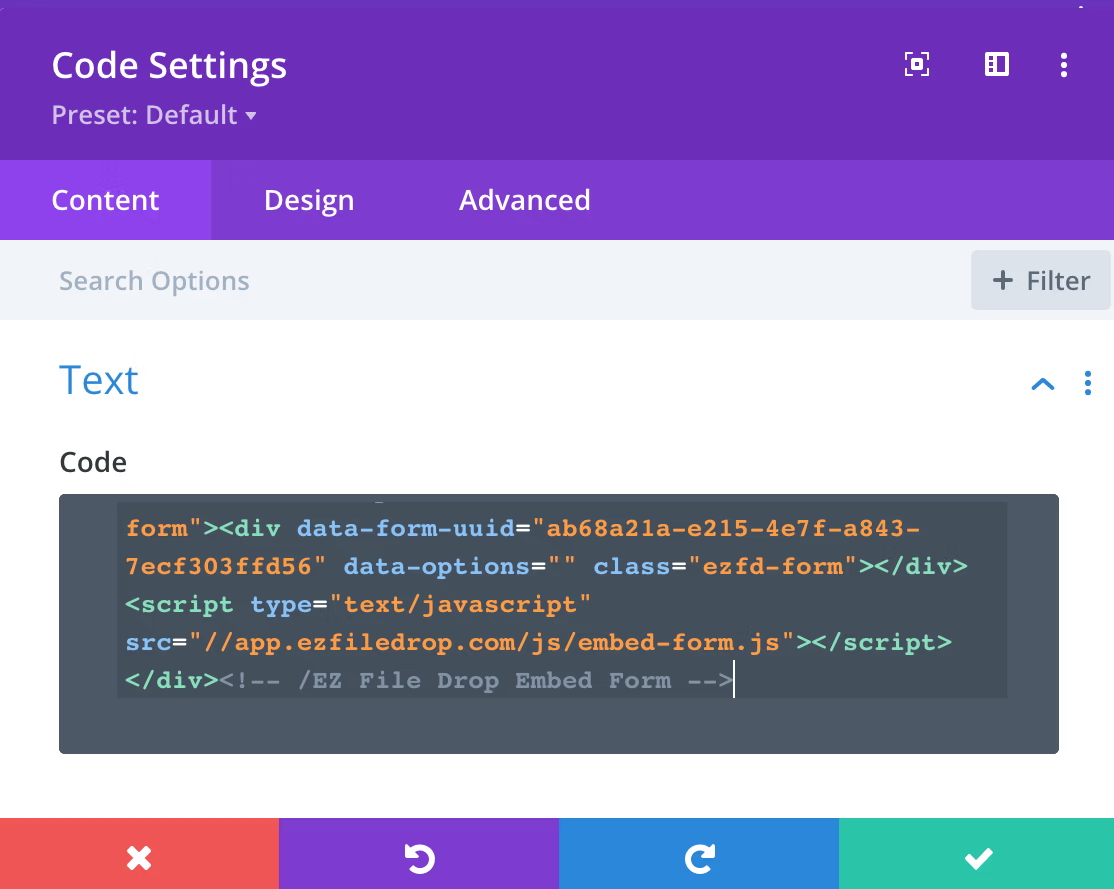
- Click the green checkmark to save the module.
- Save or update the page.
The Code module is Divi's native way to handle custom HTML. Like the Custom HTML block in Gutenberg, it's part of Divi itself, not an add-on you need to install.
Option C: Other Page Builders
Other popular page builders follow the same pattern: find the widget or module designed for raw HTML code and paste the embed there.
- Elementor: Drag an HTML widget onto the page and paste the embed code into the code field.
- Beaver Builder: Add an HTML module and paste the embed code.
- WPBakery: Add a Raw HTML element and paste the code.
- Classic Editor: If you're still on the Classic Editor, switch to the Text tab (not Visual) before pasting the code, then switch back.
The specific terminology varies, but the concept is the same: find the HTML-specific module and paste.
What the Uploader Sees
Once embedded, the form appears as a normal part of your page. Visitors can select files (individually or in bulk), add any form field data you set up, and submit. Files route directly to your cloud storage, organized into the folder you chose during form setup.
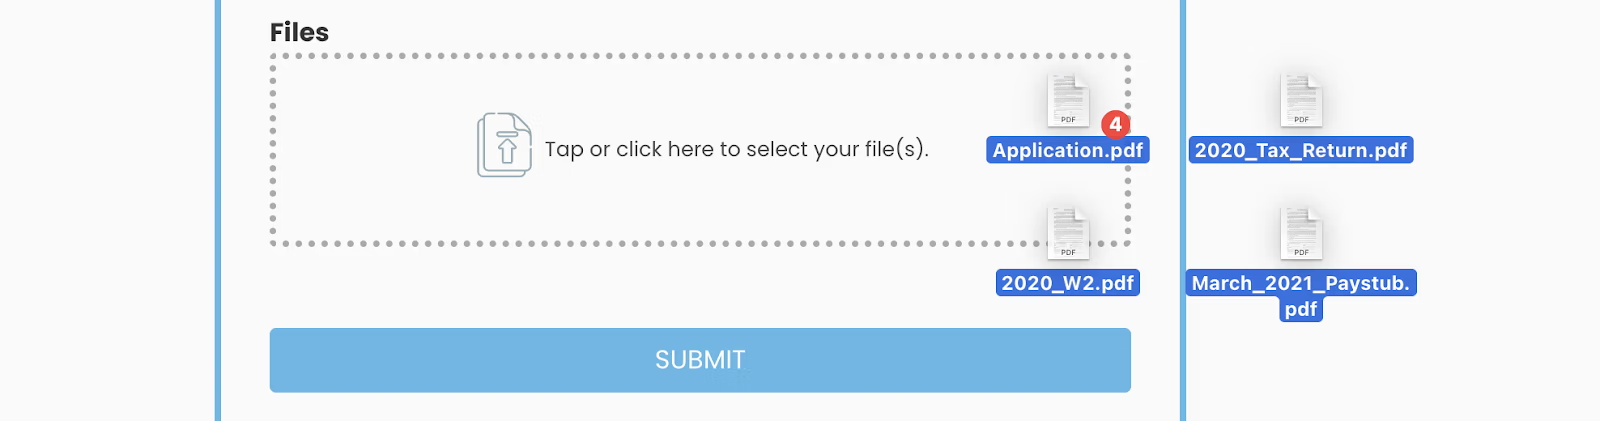
Because files upload directly to cloud storage and never touch your WordPress server, you don't need to worry about hosting upload limits. A 10 GB video file uploads through the embedded form just as easily as a 500 KB PDF.
Plugin vs. Plugin-Free: Honest Comparison
Both approaches have their place. Here's how they stack up on the dimensions that usually matter:
When a Plugin Is Actually the Better Choice
EZ File Drop isn't the right fit for every WordPress file upload use case. A few situations where a native WordPress plugin might be the better pick:
You need files stored in the WordPress Media Library. If your workflow is specifically about populating the WordPress Media Library with uploaded files (for example, you're crowdsourcing images for a gallery that lives on the site), a plugin like WPForms with the "Store file in WordPress Media Library" option is a better fit.
The form is a multi-step workflow tied to WordPress content. If uploads are tightly coupled to WordPress-specific features (user accounts, Buddypress, WooCommerce product submissions, membership gating), a WordPress-native plugin may integrate better than an embed.
You need advanced form logic. If your form requires calculations, conditional logic, signatures, payments, or appointment scheduling, a full form plugin (WPForms Pro, Gravity Forms, Formidable) may handle all of that plus file uploads in one tool. EZ File Drop focuses on file collection with supporting form fields, not the full form-builder spectrum.
If those don't describe your use case, and you're mainly trying to collect files into your existing cloud storage from visitors to your WordPress site, the plugin-free approach is simpler, scales further, and keeps your WordPress installation cleaner.
Start Collecting Files Through WordPress
Creating a WordPress file upload form without a plugin takes about five minutes: build the form in EZ File Drop, copy the embed code, paste it into a Custom HTML block or your page builder's code module, and publish. Files route directly to your existing cloud storage, skipping WordPress's server and PHP upload limits entirely.
Try EZ File Drop for free with no credit card required.
Written by Matt Townley
Try EZ File Drop Today!
Start Free TrialIntegrations
EZ File Drop + Google DriveEZ File Drop + DropboxEZ File Drop + OneDriveEZ File Drop + BoxStay in Touch


